Compare commits
No commits in common. "master" and "master" have entirely different histories.
20
README.md
|
|
@ -1,19 +1,9 @@
|
|||
# RoboRally
|
||||
|
||||

|
||||
|
||||
This project aims to provide a low-cost framework for automatic control experiments with small two-wheeled robots.
|
||||
|
||||
It consists of a list of components, step-by-step assembly instructions and the necessary software for getting started with robot control.
|
||||
|
||||
Here's a demonstration video of what is possible with these robots:
|
||||
|
||||
[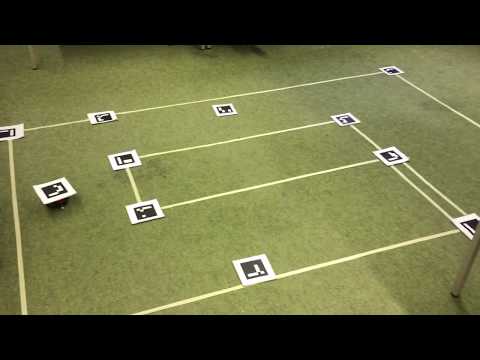](http://www.youtube.com/watch?v=u44QiJX27_s)
|
||||
# README #
|
||||
|
||||
|
||||
The project aims to be as affordable as possible. The total cost for a single robot is about 30 € or 35 $. This means you can easily build several of them e.g. for doing swarm robotics or cooperative robot experiments.
|
||||
|
||||
### Getting started ###
|
||||
For assembly instructions for the robots see the files int the docs/ subfolder of the repository.
|
||||
The first one is [1_ASSEMBLY.md](https://imaginaerraum.de/git/Telos4/RoboRally/src/branch/master/docs/1_ASSEMBLY.md) which explains what components to get and how to assemble them into a robot.
|
||||
### What is this repository for? ###
|
||||
|
||||
This is a project thats aims to create a Robo Rally clone with real robots.
|
||||
|
||||
Nothing here yet..
|
||||
|
|
@ -1,90 +0,0 @@
|
|||
# Robot assembly
|
||||
|
||||
This file contains assembly instructions for building the robots and soldering the electronics.
|
||||
|
||||
Here is how the finished robot will look like:
|
||||

|
||||
|
||||
## Components
|
||||
|
||||
The robot consists of the following components:
|
||||
|
||||
* [Adafruit Mini 3-Layer Round Robot Chassis Kit](https://www.adafruit.com/product/3244)
|
||||
* [Wemos D1 mini](https://aliexpi.com/41SY)
|
||||
* [Wemos D1 mini battery shield](https://aliexpi.com/sNwB)
|
||||
* [Wemos D1 mini motor shield (v1.0.0)](https://aliexpi.com/wngF)
|
||||
* LiPo battery
|
||||
|
||||
In addition you will need the following tools:
|
||||
|
||||
* A soldering iron
|
||||
* Solder wire
|
||||
* Heat shrink tube
|
||||
* Some wires
|
||||
* Battery connectors (fitting your battery)
|
||||
* Velcro tape
|
||||
* Self adhesive tape
|
||||
* Isolation tape
|
||||
* Pin headers
|
||||
|
||||
For the camera based position detection of the robots you will need:
|
||||
|
||||
* A camera
|
||||
* A printer
|
||||
* Paper
|
||||
* Cardboard
|
||||
|
||||
## Assembly instructions
|
||||
|
||||
### Robot chassis
|
||||
Assemble the chassis according to the instructions provided by adafruit ([see here](https://learn.adafruit.com/tri-layer-mini-round-robot-chassis-kit)).
|
||||
|
||||
### Soldering the electronics
|
||||
####Preparing Wemos D1 mini and shields
|
||||
|
||||
| Description | Image|
|
||||
|--------------|---------------|
|
||||
| Solder on two rows of 8 male pin headers to the D1 mini |  |
|
||||
| Solder on two rows of 8 female pin headers to the motor shield . |  |
|
||||
| Also solder a single row of bent pins to the motor shield. Make sure they are soldered on the right way around.| |
|
||||
| Solder a jumper to the motor shield to connect the RTS and 3V pin. This will become important later on. Also solder the I2C bridge. | |
|
||||
| Solder on two rows of 8 female pin headers with long pins to the battery shield |   |
|
||||
| Cut off the tips of the long pins such that the battery shield nicely fits into the motor shield |    |
|
||||
|
||||
#### Connecting battery shield and motor shield for motor power supply
|
||||
In the next step we connect the battery connector pins of the battery shield to the + and - pins of the motor shield. In addition we will add a connector to the motor shield where we can plug in the battery. Here is a schematic:
|
||||

|
||||
|
||||
*Note: I added a new connector instead of using the one already on the battery shield because the plug of my battery wouldn't fit in the on on the shield*
|
||||
|
||||
- First, solder two wires to the + and - pins of the battery shield and isolate them with heat shrink:
|
||||
|
||||
| Description | Image|
|
||||
|--------------|---------------|
|
||||
|Cut two small pieces of wire (about 4 cm), remove the isolation on both ends and cover them with a bit of solder | |
|
||||
|Solder the first wire to the + pin of the battery shield |  |
|
||||
| Solder the second wire to the - pin |  |
|
||||
| Cover both wires with small pieces of heat shrink tube |  |
|
||||
| Heat the shrink tube with a lighter |  |
|
||||
| This is how the battery shield should look like with the two wires |  |
|
||||
|
||||
- Next, we create a connector for the battery. In my case the battery had a male JST 2-Pin connector, so I soldered a female JST 2-Pin connector for plugin it in:
|
||||
|
||||
| Description | Image|
|
||||
|--------------|---------------|
|
||||
| Cut two small pieces of wire (about 3 cm), remove the isolation on both ends and cover them with a bit of solder |  |
|
||||
| Solder the first wire to the JST connector | |
|
||||
| Solder the second wire to the JST connector |  |
|
||||
| Cover both wires with heat shrink |  |
|
||||
| Solder the wires to the motor shield, paying attention to the polarity *(make sure it matches the polarity of your batteries!)* |  |
|
||||
|
||||
- Now, stack the battery shield on top of the motor shield and solder the battery connector:
|
||||
|
||||
| Description | Image|
|
||||
|---|---|
|
||||
| Connect the + pin of the battery shield to the + pin of the motor shield. Be sure to isolate the connection with heat shrink. Then repeat the same for the - pins. | |
|
||||
| This is how it should look like in the end. |   |
|
||||
|
||||
### Next steps
|
||||
|
||||
This concludes the main steps for the robot assembly. The next step is to fix a problem with the firmware on the motor shield in order to use it via I2C. Head over to [2_MOTOR_SHIELD_FIX.md](https://imaginaerraum.de/git/Telos4/RoboRally/src/branch/master/docs/2_MOTOR_SHIELD_FIX.md) for the instructions.
|
||||
|
|
@ -1,161 +0,0 @@
|
|||
# Motor shield fix
|
||||
|
||||
The Wemos motor shield comes with a buggy firmware which has problems with the I2C communication ([see here]([buggy firmware](https://hackaday.io/project/18439-motor-shield-reprogramming))).
|
||||
Luckily, some guys figured out how to update the firmware of the STM32 on the motor shield with a custom one that fixes these issues.
|
||||
|
||||
These are the necessary steps:
|
||||
|
||||
- Install arm compiler:
|
||||
```
|
||||
$ sudo add-apt-repository ppa:team-gcc-arm-embedded/ppa
|
||||
$ sudo apt-get update
|
||||
$ sudo apt-get install gcc-arm-embedded
|
||||
```
|
||||
|
||||
- Build the firmware:
|
||||
|
||||
Get the firmware from: [https://github.com/pbugalski/wemos_motor_shield](https://github.com/pbugalski/wemos_motor_shield)
|
||||
```
|
||||
$ make
|
||||
```
|
||||
-> This creates a file called motor_shield.bin
|
||||
|
||||
### Upload empty firmware to Wemos D1 mini
|
||||
We will program the STM32 on the motor shield using the serial USB connection from the Wemos D1 mini. The D1 mini should
|
||||
just pass through the serial communication to the STM32. For this we need to upload a dummy firmware to the D1 mini.
|
||||
|
||||
- Install esptool
|
||||
The chip on the Wemos D1 mini is a Esp8266. In order to flash programs on this chip we will use esptool by Espressif.
|
||||
You can install it using pip:
|
||||
```
|
||||
$ pip install esptool
|
||||
```
|
||||
|
||||
- Make sure the RTS and 3V port of the Wemos motor shield are connected by a wire. Also make sure that the I2C bridge connection on the motor shield is set.
|
||||

|
||||
|
||||
- Plug the Wemos D1 mini on top of the motor shield and then connect it to your PC using a micro USB cable
|
||||
|
||||
- Compile the sketch below into a .bin file using the Arduino IDE -> `dummy_sketch.ino.d1_mini.bin` or use the one from `bin/dummy_sketch.ino.d1_min.bin`
|
||||
|
||||
Note: If you compile it yourself make sure you choose the Wemos D1 mini board as target for the build.
|
||||
|
||||
```
|
||||
void setup() {
|
||||
// just some dummy code
|
||||
}
|
||||
|
||||
void loop() {
|
||||
// just some dummy code
|
||||
}
|
||||
```
|
||||
- Erase flash on the chip:
|
||||
```
|
||||
$ esptool.py --port /dev/ttyUSB0 erase_flash
|
||||
```
|
||||
- Flash the dummy sketch:
|
||||
```
|
||||
$ esptool.py --port /dev/ttyUSB0 --baud 460800 write_flash --flash_size=detect 0 dummy_sketch.ino.d1_mini.bin/dummy_sketch.ino.d1_mini.bin.ino.d1_mini.bin
|
||||
```
|
||||
|
||||
### Install stm32flash utility:
|
||||
To upload a new firmware to the STM32 that is running on the motor shield we need the STM32 flash utility.
|
||||
You can download from: [https://sourceforge.net/projects/stm32flash/files/](https://sourceforge.net/projects/stm32flash/files/)
|
||||
You should then build and install it using the usual:
|
||||
```
|
||||
$ make
|
||||
$ make install
|
||||
```
|
||||
|
||||
### Connect the motor shield to D1 mini:
|
||||
Use some jumper cables to connect the motor shield and the D1 mini in the following way.
|
||||
|
||||
|Wemos D1 mini | Motor shield|
|
||||
|--------------|---------------|
|
||||
|TX | D1|
|
||||
|RX | D2|
|
||||
|3V | 3V|
|
||||
|GND | GND |
|
||||
|
||||

|
||||

|
||||
|
||||
### Flash the new firmware on the STM32:
|
||||
- Connect the D1 mini to your PC using a micro USB cable.
|
||||

|
||||
- Check if you can communicate with the STM32:
|
||||
```
|
||||
$ stm32flash /dev/ttyUSB0
|
||||
```
|
||||
|
||||
Output should be:
|
||||
```
|
||||
Interface serial_posix: 57600 8E1
|
||||
Version : 0x31
|
||||
Option 1 : 0x00
|
||||
Option 2 : 0x00
|
||||
Device ID : 0x0444 (STM32F03xx4/6)
|
||||
- RAM : 4KiB (2048b reserved by bootloader)
|
||||
- Flash : 32KiB (size first sector: 4x1024)
|
||||
- Option RAM : 16b
|
||||
- System RAM : 3KiB
|
||||
```
|
||||
|
||||
- Unlock the shield for flashing:
|
||||
```
|
||||
$ stm32flash -k /dev/ttyUSB0
|
||||
```
|
||||
|
||||
Output should be:
|
||||
```
|
||||
stm32flash 0.5
|
||||
|
||||
http://stm32flash.sourceforge.net/
|
||||
|
||||
Interface serial_posix: 57600 8E1
|
||||
Version : 0x31
|
||||
Option 1 : 0x00
|
||||
Option 2 : 0x00
|
||||
Device ID : 0x0444 (STM32F03xx4/6)
|
||||
- RAM : 4KiB (2048b reserved by bootloader)
|
||||
- Flash : 32KiB (size first sector: 4x1024)
|
||||
- Option RAM : 16b
|
||||
- System RAM : 3KiB
|
||||
Read-UnProtecting flash
|
||||
Done.
|
||||
```
|
||||
|
||||
- Flash new motor driver:
|
||||
```
|
||||
$ stm32flash -f -v -w motor_shield.bin /dev/ttyUSB0
|
||||
```
|
||||
|
||||
Output should be:
|
||||
```
|
||||
stm32flash 0.5
|
||||
|
||||
http://stm32flash.sourceforge.net/
|
||||
|
||||
Using Parser : Raw BINARY
|
||||
Interface serial_posix: 57600 8E1
|
||||
Version : 0x31
|
||||
Option 1 : 0x00
|
||||
Option 2 : 0x00
|
||||
Device ID : 0x0444 (STM32F03xx4/6)
|
||||
- RAM : 4KiB (2048b reserved by bootloader)
|
||||
- Flash : 32KiB (size first sector: 4x1024)
|
||||
- Option RAM : 16b
|
||||
- System RAM : 3KiB
|
||||
Write to memory
|
||||
Erasing memory
|
||||
Wrote and verified address 0x08000be8 (100.00%) Done.
|
||||
```
|
||||
|
||||
#### Cleaning up
|
||||
Finally, you can remove the wire between RTS and 3V.
|
||||
At this point, please make sure that the I2C bridge on the Wemos Motor shield is connected. This is necessary for I2C to work correctly.
|
||||
|
||||
### Next steps
|
||||
Continue with the instructions in the file [3_ROBOT_SETUP.md](https://imaginaerraum.de/git/Telos4/RoboRally/src/branch/master/docs/3_ROBOT_SETUP.md) to complete the setup of the robot.
|
||||
|
||||
|
||||
|
|
@ -1,140 +0,0 @@
|
|||
# Robot setup
|
||||
|
||||
This file explains how to setup the software for the robots. It assumes that you already assembled your robot according to the instructions in [1_ASSEMBLY.md](https://imaginaerraum.de/git/Telos4/RoboRally/src/branch/master/docs/1_ASSEMBLY.md) and that you updated the firmware of the motor shield as described in [2_MOTOR_SHIELD_FIX.md](https://imaginaerraum.de/git/Telos4/RoboRally/src/branch/master/docs/2_MOTOR_SHIELD_FIX.md).
|
||||
|
||||
Before we start, stack the D1 mini ontop of the battery shield and connect it to your computer using a micro USB cable:
|
||||

|
||||

|
||||
|
||||
### Flash Micropython to the Wemos D1 mini
|
||||
The first step is to flash the micropython firmware to the D1 mini.
|
||||
You can download the latest micropython firmware for the ESP8266 from [here](http://micropython.org/download#esp8266). I used version _esp8266-20190125-v1.10.bin_ but you can also use a more recent version.
|
||||
The firmware can be flashed on the D1 mini using the following commands:
|
||||
```
|
||||
$ esptool.py --port /dev/ttyUSB0 erase_flash
|
||||
$ esptool.py --port /dev/ttyUSB0 --baud 460800 write_flash --flash_size=detect 0 esp8266-20190125-v1.10.bin
|
||||
```
|
||||
|
||||
### Communicating with the D1 mini
|
||||
After flashing the firmware we can access the python prompt on the microcontroller using a serial communication program such as picocom.
|
||||
|
||||
On Ubuntu you can install this with
|
||||
```
|
||||
$ sudo apt-get install picocom
|
||||
```
|
||||
Connect using picocom:
|
||||
```
|
||||
$ picocom /dev/ttyUSB0 -b115200
|
||||
```
|
||||
First we enable WebREPL on the microcontroller which allows us to easily upload files and debug the robots via WiFi.
|
||||
*(I will use `>>>` in order to indicate commands which should be issued in the Micropython prompt)*
|
||||
```
|
||||
>>> import webrepl_setup
|
||||
```
|
||||
-> choose enable, set a password and choose reboot
|
||||
|
||||
Now we set up an access point on the D1 mini:
|
||||
```
|
||||
>>> import network
|
||||
>>> ap_if = network.WLAN(network.AP_IF)
|
||||
>>> ap_if.active(True)
|
||||
>>> ap_if.ifconfig() # this prints the IP
|
||||
```
|
||||
The default password for this access point is: `micropythoN`
|
||||
|
||||
Alternatively, you can also connect to an existing wifi network using:
|
||||
```
|
||||
>>> import network
|
||||
>>> sta_if = network.WLAN(network.STA_IF)
|
||||
>>> sta_if.active(True)
|
||||
>>> sta_if.connect("<SSID>", "<PW>")
|
||||
>>> sta_if.ifconfig() # this prints the IP
|
||||
```
|
||||
|
||||
Join the same WiFi network with your PC (either the access point or the local network) and connect to the D1 mini via the [online WebREPL](http://micropython.org/webrepl):
|
||||
Enter IP from above and click connect. Login with the password you set for the WebREPL.
|
||||
|
||||

|
||||
|
||||

|
||||
|
||||

|
||||
|
||||
### Making settings permanent
|
||||
In order to avoid having to set up the WebREPL and the WiFi everytime we reboot the robot we can upload a file called boot.py which runs each time the robot restarts:
|
||||
|
||||
- Find the file `boot.py` in the `micropython_firmware/` subfolder and edit the lines indicated with `# TODO`. In particular, set the wifi network, password and IP addresses. You should choose a unique IP address for each robot
|
||||
```
|
||||
# TODO: edit these lines
|
||||
network_name = 'Your WiFi network' # existing wifi network to connect to (leave empty if unused)
|
||||
password = 'Your password' # password for the network
|
||||
desired_ip = '192.168.1.101' # the robot will be reachable by this IP in the network
|
||||
subnet = '255.255.255.0'
|
||||
gateway = '192.168.1.1'
|
||||
dns = '192.168.1.1'
|
||||
# TODO end edit
|
||||
```
|
||||
- Upload boot.py via WebREPL
|
||||
|
||||

|
||||
- Now the robot will automatically connect to WiFi network you set and start a WebREPL server after reboot.
|
||||
|
||||
*Note: If the WiFi network cannot be found the microcontroller will instead open an access point.*
|
||||
|
||||
### Upload robot firmware
|
||||
Next, upload the motor controller script to the microcontroller. At the moment the firmware consists of the following three files located in `micropython_firmware/`:
|
||||
|
||||
- `main.py` Main script handling network communication and control
|
||||
- `d1motor.py` Interface for the Wemos D1 mini motor shield
|
||||
- `l293dmotor.py`Interface for alternative motor driver using L293D (no longer used)
|
||||
|
||||
You can upload these files the same way you did before with the WebREPL. After uploading all the files reboot the microcontroller by pressing the reset button or by pressing `Ctrl+D` in the WebREPL prompt.
|
||||
|
||||
### Test the robot
|
||||
Now it's time to test if everything is working fine.
|
||||
|
||||
- Disconnect the USB cable from the microcontroller and connect the battery to the battery connector:
|
||||

|
||||
|
||||
- Next, connect the two motors of the robot to the motor shield according to the following sketch:
|
||||

|
||||

|
||||
|
||||
- Test if you can reach the robot using
|
||||
```
|
||||
$ ping 192.168.1.101
|
||||
```
|
||||
*Note: Make sure you use the correct IP address for your robot.*
|
||||
|
||||
- If everything worked, connect to the robot via WebREPL as before. Don't worry if the prompt does not appear to be working. The robot is running a program waiting for incoming connections for remote control.
|
||||
We can connect to the robot via a socket on port `1234`. There is a simple demo program which illustrates how to control the robot remotely via keyboard. The program uses `pygame` for input handling so make sure to install it using
|
||||
```
|
||||
$ sudo pip install pygame
|
||||
```
|
||||
The program is located in the `remote_control/`. Run it using
|
||||
```
|
||||
$ python keyboard_controller.py 192.168.1.101
|
||||
```
|
||||
When running the program you should see an output in the WebREPL that a connection was established.
|
||||
You can use the arrow keys for sending commands to the microcontroller which it then passes on to the motors.
|
||||
|
||||
Now you're all set up for controlling your robot remotely via wifi.
|
||||
You can control the robot by sending commands to the robot as a string containing `'(u1, u2)\n'`, where `u1` and `u2` are floats in the range `[-1.0, 1.0]`, e.g. `'(0.3, -0.6)\n'`.
|
||||
Have a look at the `keyboard_controller.py` script to see how this works in python.
|
||||
|
||||
### Isolating the electronics
|
||||
Since the mounting plates of the robot are made of metal it is a good idea to put some isolation around the electronics. You can use some isolation tape to cover the exposed pins:
|
||||
|
||||

|
||||
You can also add some velcro tape to the electronics, the battery and the robot to easily attach and remove the microcontroller from the robot.
|
||||
|
||||

|
||||

|
||||
|
||||
### Charging the battery
|
||||
In order to charge the battery of the robot just plug a micro USB cable into the USB port of the battery shield.
|
||||
|
||||

|
||||
|
||||
### Next steps
|
||||
The next step is to setup the position detection using ROS. For this see the [4_ROS_SETUP.md](https://imaginaerraum.de/git/Telos4/RoboRally/src/branch/master/docs/4_ROS_SETUP.md)
|
||||
|
|
@ -1,172 +0,0 @@
|
|||
# ROS setup
|
||||
This file explains how to install and set up ROS (Robot Operating System) such that it can be used to detect the position of the robot via camera.
|
||||
|
||||
## Installing Software
|
||||
|
||||
This installation process has been tested with Ubuntu 16.04 LTS.
|
||||
|
||||
### ROS installation
|
||||
The first step is to install ROS on your computer. I used the version ROS Kinetic, but other versions of ROS should also work, as long as the packages we use are available or you compile them yourself.
|
||||
|
||||
Follow the instructions [here](http://wiki.ros.org/kinetic/Installation) and choose the version `ros-kinetic-desktop-full`.
|
||||
|
||||
### Installing required ROS packages
|
||||
We use the following packages for image detection:
|
||||
|
||||
- ros-kinetic-aruco-detect
|
||||
- ros-kinetic-fiducial-slam
|
||||
- ros-kinetic-cv-camera
|
||||
|
||||
Install each of them using
|
||||
```
|
||||
$ sudo apt-get install <package-name>
|
||||
```
|
||||
|
||||
## Setup
|
||||
|
||||
For control experiments we need to know the position of the robots on the ground and its orientation. To achieve this we place a camera on the ceiling and use image detection relying on ArUco markers.
|
||||
|
||||
### Camera setup
|
||||
For the image detection to work correctly we need to calibrate the camera first.
|
||||
|
||||
#### Testing the camera
|
||||
First, plug in your camera and test if it works with the `cv_camera` package:
|
||||
|
||||
- Start ROS:
|
||||
```
|
||||
$ roscore
|
||||
```
|
||||
- Set the device id for your camera. Typically this will be `0` or `1`
|
||||
```
|
||||
$ rosparam set cv_camera/device_id 0
|
||||
```
|
||||
- Run the camera node
|
||||
```
|
||||
$ rosrun cv_camera cv_camera_node
|
||||
```
|
||||
- Test if you can see the live image from the camera using the command
|
||||
```
|
||||
$ rosrun image_view image_view image:=/cv_camera/image_raw
|
||||
```
|
||||
#### Calibrating the camera
|
||||
Next, in order to calibrate the camera follow the instructions at [http://wiki.ros.org/camera_calibration/Tutorials/MonocularCalibration](http://wiki.ros.org/camera_calibration/Tutorials/MonocularCalibration).
|
||||
|
||||
These instructions mainly consist of the following steps:
|
||||
|
||||
- Print a [checkerboard image](https://imaginaerraum.de/git/Telos4/RoboRally/src/branch/master/docs/images/check-108.pdf) on a sheet of paper and measure the size of the squares with a ruler.
|
||||
- Run the command
|
||||
```
|
||||
$ rosrun camera_calibration cameracalibrator.py --size 8x6 --square 0.108 image:=/cv_camera/image_raw camera:=/cv_camera
|
||||
```
|
||||
*Note: Make sure to replace the dimensions of the checkerboard squares with the value you measured in the previous step (in meters)!*
|
||||
|
||||
- Move the checkerboard in front of the camera until you have gathered sufficient data and the click on calibrate
|
||||
- After a successful calibration click *'SAVE'* to store the camera calibration file which ends in `.yaml`
|
||||
- The calibration data gets written to `/tmp/calibrationdata.tar.gz`. Copy it from there to `~/.ros/camera_info` (create the folder if it does not exists). Then extract it and move and rename the file `ost.yaml` located in `calibrationdata/` to `~/.ros/camera_info/camera.yaml`. Afterwards, you can delete the `calibrationdata` folder and the file `calibrationdata.tar.gz`.
|
||||
|
||||
Now, when you restart the `cv_camera` node it also publishes the intrinsic camera parameters as the topic `/cv_camera/camera_info` which can be used to rectify the image.
|
||||
|
||||
*Remark: When you restart the camera node you may receive a warning that the camera name does not match the name in the calibration file. This can be safely ignored, but if you want to get rid of the warning just edit the file `camera.yaml` and replace `narrow_stereo` with `camera`.*
|
||||
|
||||
|
||||
### Preparing robots for image detection
|
||||
In the next step, we place markers on the robots such that the can be detected by the camera. For this we use the [fiducials](http://wiki.ros.org/fiducials) package:
|
||||
|
||||
- Generate some ArUco markers for your robots using this [ArUco marker generator](http://chev.me/arucogen/). Choose Original ArUco as the dictionary. You may have to experiment with the marker size a bit depending on the resolution of your camera and the distance to the robots. I used markers of size `100 mm`.
|
||||
- Print ArUco markers on paper. Measure the marker size and make sure that it fits the size you specified.
|
||||
|
||||

|
||||
- Cut the markers and glue them on cardboard. Make sure to leave a white border around the marker. It's also a good idea to label the marker with the id.
|
||||
|
||||

|
||||
- Fix the markers on the robot. First, add a new layer to the robot using screws and then fix the marker to the layer using e.g. double sided tape or velcro tape.
|
||||
|
||||

|
||||

|
||||
|
||||
### Install position detection node
|
||||
The image detection computes the position and orientation of the marker that was placed on the robot in relation to the camera position.
|
||||
In order to get from this the position of the robot in the 2D plane (the floor) we need to transform it first.
|
||||
In this step we will build and install a ROS node that will do exactly this for us.
|
||||
The node projects the position of each detected marker on the 2D plane and publishes its ID, position and angle of rotation in the plane as a ROS messages.
|
||||
|
||||
To install the node do the following:
|
||||
|
||||
- Change in the directory `fiducial_transform/`in the root folder of the repository:
|
||||
```
|
||||
$ cd fiducial_transform
|
||||
```
|
||||
- Build the package:
|
||||
```
|
||||
$ catkin_make
|
||||
```
|
||||
- Source that package so you can use it:
|
||||
```
|
||||
$ source devel/setup.bash
|
||||
```
|
||||
*Note: In order to avoid doing this every time you want to start the marker detection you can add the following line to your `~/.bashrc` file:*
|
||||
```
|
||||
$ source $ROBO_RALLY_GIT/fiducial_transform/devel/setup.bash
|
||||
```
|
||||
*where `$ROBO_RALLY_GIT` is the location of this repository.*
|
||||
|
||||
## Testing
|
||||
Now it's time to test if the position detection is working correctly.
|
||||
|
||||
### Running the position detection
|
||||
Generally, the following steps are necessary to run the position detection for the robots:
|
||||
|
||||
- Start roscore:
|
||||
```
|
||||
$ roscore
|
||||
```
|
||||
|
||||
- Plug in the camera and start the camera node:
|
||||
```
|
||||
$ rosparam set cv_camera/device_id 0 # make sure to set the correct device id for your camera!
|
||||
$ rosrun cv_camera cv_camera_node
|
||||
```
|
||||
|
||||
- Optional: Check if the camera works correctly;
|
||||
```
|
||||
$ rosrun image_view image_view image:=/cv_camera/image_raw
|
||||
```
|
||||
You should see a window displaying a live view of the camera image.
|
||||
|
||||

|
||||
|
||||
- Start ArUco marker detection:
|
||||
```
|
||||
$ roslaunch aruco_detect aruco_detect.launch camera:=cv_camera image:=image_raw dictionary:=16 transport:= fiducial_len:=0.1
|
||||
```
|
||||
*Note: Make sure you use the correct camera, image, dictionary and marker length in this step!*
|
||||
|
||||
- Optional: Check if marker detection works correctly:
|
||||
```
|
||||
$ rosrun image_view image_view image:=/fiducial_images
|
||||
```
|
||||
Place a marker in the field of view of the camera and check if it gets correctly detected by the image detection, i.e. there is a border around the square of the marker and arrows indicating its orientation.
|
||||
|
||||

|
||||

|
||||
If the marker is not detected correctly, please check that you are using the correct dictionary, that you camera was calibrated and that you are launching the `aruco_detect` node with the correct parameters
|
||||
|
||||
- Run marker transformation node
|
||||
```
|
||||
$ rosrun fiducial_transform fiducial_transform_script
|
||||
```
|
||||
|
||||
Now when you run
|
||||
```
|
||||
$ rostopic echo /marker_id_pos_angle
|
||||
```
|
||||
and you place a marker in the field of view of the camera you should see the markers id, position and orientation as output on the console.
|
||||
|
||||

|
||||
You can also access this data using a ROS listener.
|
||||
|
||||
|
||||
## Wrapping up
|
||||
Now you're all set up and ready to start your own control experiments with the robots.
|
||||
You could for example implement a simple PID controller to let the robot perform turns or drive from one position to another.
|
||||
For some inspiration take a look at the demo programs `MPC_position_controller.py` or `racing_game.py`.
|
||||
|
|
@ -1,5 +0,0 @@
|
|||
This documents explains how to set up and run the race game demo.
|
||||
|
||||
Requirements:
|
||||
- pygame
|
||||
- shapely package
|
||||
|
Before Width: | Height: | Size: 64 KiB |
|
Before Width: | Height: | Size: 152 KiB |
|
Before Width: | Height: | Size: 69 KiB |
|
Before Width: | Height: | Size: 31 KiB |
|
Before Width: | Height: | Size: 40 KiB |
|
Before Width: | Height: | Size: 36 KiB |
|
Before Width: | Height: | Size: 38 KiB |
|
Before Width: | Height: | Size: 64 KiB |
|
Before Width: | Height: | Size: 53 KiB |
|
Before Width: | Height: | Size: 86 KiB |
|
Before Width: | Height: | Size: 79 KiB |
|
Before Width: | Height: | Size: 38 KiB |
|
Before Width: | Height: | Size: 52 KiB |
|
Before Width: | Height: | Size: 58 KiB |
|
Before Width: | Height: | Size: 61 KiB |
|
Before Width: | Height: | Size: 146 KiB |
|
Before Width: | Height: | Size: 73 KiB |
|
Before Width: | Height: | Size: 45 KiB |
|
Before Width: | Height: | Size: 55 KiB |
|
Before Width: | Height: | Size: 75 KiB |
|
Before Width: | Height: | Size: 87 KiB |
|
Before Width: | Height: | Size: 65 KiB |
|
Before Width: | Height: | Size: 48 KiB |
|
Before Width: | Height: | Size: 54 KiB |
|
Before Width: | Height: | Size: 32 KiB |
|
Before Width: | Height: | Size: 69 KiB |
|
Before Width: | Height: | Size: 83 KiB |
|
Before Width: | Height: | Size: 104 KiB |
|
Before Width: | Height: | Size: 62 KiB |
|
Before Width: | Height: | Size: 76 KiB |
|
Before Width: | Height: | Size: 47 KiB |
|
Before Width: | Height: | Size: 62 KiB |
|
Before Width: | Height: | Size: 56 KiB |
|
Before Width: | Height: | Size: 77 KiB |
|
Before Width: | Height: | Size: 68 KiB |
|
Before Width: | Height: | Size: 62 KiB |
|
Before Width: | Height: | Size: 44 KiB |
|
Before Width: | Height: | Size: 47 KiB |
|
Before Width: | Height: | Size: 58 KiB |
|
Before Width: | Height: | Size: 144 KiB |
|
Before Width: | Height: | Size: 213 KiB |
|
Before Width: | Height: | Size: 57 KiB |
|
Before Width: | Height: | Size: 42 KiB |
|
Before Width: | Height: | Size: 35 KiB |
|
Before Width: | Height: | Size: 50 KiB |
|
Before Width: | Height: | Size: 61 KiB |
|
Before Width: | Height: | Size: 72 KiB |
|
Before Width: | Height: | Size: 67 KiB |
|
Before Width: | Height: | Size: 63 KiB |
|
Before Width: | Height: | Size: 59 KiB |
|
Before Width: | Height: | Size: 69 KiB |
|
Before Width: | Height: | Size: 105 KiB |
|
Before Width: | Height: | Size: 47 KiB |
|
Before Width: | Height: | Size: 137 KiB |
|
Before Width: | Height: | Size: 108 KiB |
|
Before Width: | Height: | Size: 59 KiB |
|
Before Width: | Height: | Size: 65 KiB |
|
Before Width: | Height: | Size: 87 KiB |
|
Before Width: | Height: | Size: 5.9 KiB |
|
Before Width: | Height: | Size: 3.6 KiB |
|
Before Width: | Height: | Size: 6.6 KiB |
|
Before Width: | Height: | Size: 13 KiB |
|
|
@ -1,44 +0,0 @@
|
|||
Installing Intel RealSense drivers:
|
||||
###################################
|
||||
echo 'deb http://realsense-hw-public.s3.amazonaws.com/Debian/apt-repo xenial main' || sudo tee /etc/apt/sources.list.d/realsense-public.list
|
||||
sudo add-apt-repository "deb http://realsense-hw-public.s3.amazonaws.com/Debian/apt-repo xenial main"
|
||||
sudo apt-get update
|
||||
sudo apt-get install librealsense2-dev
|
||||
sudo apt-get install librealsense2-dkms # enter a key for installing driver when asked (in my case the pw was realsense2019bt)
|
||||
sudo apt-get install librealsense2-utils
|
||||
|
||||
Check if drivers were installed sucessfully:
|
||||
modinfo uvcvideo | grep "version:" # -> this should report the realsense camera driver
|
||||
|
||||
|
||||
# Installing the ROS package (assuming ros base is installed):
|
||||
Install dependencies:
|
||||
sudo apt-get install ros-kinetic-cv-bridge -y
|
||||
sudo apt-get install ros-kinetic-image-transport
|
||||
sudo apt-get install ros-kinetic-tf -y
|
||||
sudo apt-get install ros-kinetic-diagnostic-updater -y
|
||||
sudo apt-key adv --keyserver hkp://keyserver.ubuntu.com:80 --recv-key C1CF6E31E6BADE8868B172B4F42ED6FBAB17C654
|
||||
sudo apt-get update
|
||||
sudo apt-get install ros-kinetic-ddynamic-reconfigure -y
|
||||
|
||||
# clone github repo:
|
||||
git clone https://github.com/IntelRealSense/realsense-ros.git
|
||||
cd realsense-ros/
|
||||
git checkout `git tag | sort -V | grep -P "^\d+\.\d+\.\d+" | tail -1`
|
||||
mkdir -p ~/realsense_catkin_ws/src/realsense
|
||||
mv * ~/realsense_catkin_ws/src/realsense/
|
||||
|
||||
cd ~/realsense_catkin_ws/src/
|
||||
catkin_init_workspace
|
||||
cd ..
|
||||
catkin_make clean
|
||||
catkin_make -DCATKIN_ENABLE_TESTING=False -DCMAKE_BUILD_TYPE=Release
|
||||
catkin_make install
|
||||
echo "source ~/realsense_catkin_ws/devel/setup.bash" >> ~/.bashrc
|
||||
source ~/.bashrc
|
||||
|
||||
Test with:
|
||||
roslaunch realsense2_camera rs_camera.launch
|
||||
|
||||
Possible issue:
|
||||
The camera requires a USB 3 port to provide full resolution streams
|
||||
|
|
@ -1,56 +0,0 @@
|
|||
Creating ros package with catkin and adding custom messages:
|
||||
############################################################
|
||||
1. Create a workspace:
|
||||
----------------------
|
||||
$ mkdir catkin_ws
|
||||
$ cd catkin_ws
|
||||
$ mkdir src
|
||||
$ catkin_make
|
||||
$ source devel/setup.bash
|
||||
|
||||
2. Create the package:
|
||||
----------------------
|
||||
$ cd catkin_ws/src
|
||||
$ catkin_create_pkg <package_name> std_msgs rospy roscpp
|
||||
$ cd ..
|
||||
$ catkin_make # this build the package
|
||||
|
||||
3. Create the custom messages:
|
||||
------------------------------
|
||||
$ cd catkin_ws/src/<package_name>
|
||||
$ mkdir msg
|
||||
$ cd msg
|
||||
$ echo "int64 num" > Num.msg
|
||||
Then edit the package.xml file and add the following:
|
||||
<build_depend>message_generation</build_depend>
|
||||
<exec_depend>message_runtime</exec_depend>
|
||||
|
||||
Also edit CMakeLists.txt and to the find_package() function add:
|
||||
message_generation
|
||||
and to the catkin_package() add:
|
||||
CATKIN_DEPENDS message_runtime
|
||||
|
||||
Then, find add_message_files() (uncomment if necessary) and change it to the following:
|
||||
add_message_files(
|
||||
FILES
|
||||
Num.msg
|
||||
)
|
||||
|
||||
Finally, uncomment the generate_messages() function such that it reads:
|
||||
generate_messages(
|
||||
DEPENDENCIES
|
||||
std_msgs
|
||||
)
|
||||
|
||||
To build the new messages do the following:
|
||||
$ cd catkin_ws
|
||||
$ catkin_make # builds the new messages
|
||||
$ catkin_make install
|
||||
|
||||
As the last step, source the setup.bash:
|
||||
$ . install/setup.bash
|
||||
|
||||
Now the new messages should be available and you can find them with
|
||||
$ rosmsg list
|
||||
|
||||
Don't forget to source the setup.bash everytime you want to use the messages!
|
||||
BIN
docu/EXP Tech.pdf
Normal file
BIN
docu/nodeMCU_pinout.png
Normal file
|
After Width: | Height: | Size: 143 KiB |
9
docu/notes.txt
Normal file
|
|
@ -0,0 +1,9 @@
|
|||
https://hackaday.com/2016/06/14/hackaday-prize-entry-micro-robots-for-education/
|
||||
|
||||
https://www.adafruit.com/product/3216
|
||||
|
||||
https://www.exp-tech.de/plattformen/robotik/roboterfahrzeuge/7673/adafruit-mini-round-robot-chassis-kit-2wd-with-dc-motors?gclid=EAIaIQobChMIrpHIq4Ke4QIVSeAYCh0LTgdWEAQYCCABEgIQcfD_BwE
|
||||
|
||||
https://www.exp-tech.de/plattformen/robotik/roboterfahrzeuge/7898/adafruit-mini-3-layer-round-robot-chassis-kit-2wd-with-dc-motors?gclid=EAIaIQobChMIrpHIq4Ke4QIVSeAYCh0LTgdWEAQYCyABEgI76vD_BwE
|
||||
|
||||
|
||||
21
docu/pin_out.txt
Normal file
|
|
@ -0,0 +1,21 @@
|
|||
Breadboard | NodeMCU, GPIO, index | H-bridge
|
||||
-------------------------------------
|
||||
13 | D0, 16, 0 | 15 # driver channel 4 input
|
||||
14 | D1, 5, 1 | 10 # driver channel 3 input
|
||||
15 | D2, 4, 2 | 9 # driver 3/4 enable (pwm)
|
||||
16 | D3, 0, 3 | 2 # driver channel 2 input
|
||||
17 | D4, 2, 4 | 7 # driver channel 1 input
|
||||
20 | D5, 14, 5 | 1 # driver 1/2 enable (pwm)
|
||||
26 | GND
|
||||
|
||||
Motor example:
|
||||
First motor:
|
||||
GPIO16 -> HIGH (index 0)
|
||||
GPIO05 -> LOW (index 1)
|
||||
GPIO04 -> HIGH (index 2)
|
||||
|
||||
Second motor:
|
||||
GPIO00 -> HIGH (index 3)
|
||||
GPIO02 -> LOW (index 4)
|
||||
GPIO14 -> HIGH (index 5)
|
||||
|
||||
5
docu/shields.txt
Normal file
|
|
@ -0,0 +1,5 @@
|
|||
TODO: Use the following shields
|
||||
|
||||
Battery shield: https://wiki.wemos.cc/products:retired:battery_shield_v1.1.0
|
||||
|
||||
Motor shield: https://wiki.wemos.cc/products:retired:motor_shield_v1.0.0
|
||||
|
|
@ -1,206 +0,0 @@
|
|||
cmake_minimum_required(VERSION 2.8.3)
|
||||
project(fiducial_transform)
|
||||
|
||||
## Compile as C++11, supported in ROS Kinetic and newer
|
||||
# add_compile_options(-std=c++11)
|
||||
|
||||
## Find catkin macros and libraries
|
||||
## if COMPONENTS list like find_package(catkin REQUIRED COMPONENTS xyz)
|
||||
## is used, also find other catkin packages
|
||||
find_package(catkin REQUIRED COMPONENTS
|
||||
roscpp
|
||||
rospy
|
||||
std_msgs
|
||||
message_generation
|
||||
)
|
||||
|
||||
## System dependencies are found with CMake's conventions
|
||||
# find_package(Boost REQUIRED COMPONENTS system)
|
||||
|
||||
|
||||
## Uncomment this if the package has a setup.py. This macro ensures
|
||||
## modules and global scripts declared therein get installed
|
||||
## See http://ros.org/doc/api/catkin/html/user_guide/setup_dot_py.html
|
||||
catkin_python_setup()
|
||||
|
||||
|
||||
################################################
|
||||
## Declare ROS messages, services and actions ##
|
||||
################################################
|
||||
|
||||
## To declare and build messages, services or actions from within this
|
||||
## package, follow these steps:
|
||||
## * Let MSG_DEP_SET be the set of packages whose message types you use in
|
||||
## your messages/services/actions (e.g. std_msgs, actionlib_msgs, ...).
|
||||
## * In the file package.xml:
|
||||
## * add a build_depend tag for "message_generation"
|
||||
## * add a build_depend and a exec_depend tag for each package in MSG_DEP_SET
|
||||
## * If MSG_DEP_SET isn't empty the following dependency has been pulled in
|
||||
## but can be declared for certainty nonetheless:
|
||||
## * add a exec_depend tag for "message_runtime"
|
||||
## * In this file (CMakeLists.txt):
|
||||
## * add "message_generation" and every package in MSG_DEP_SET to
|
||||
## find_package(catkin REQUIRED COMPONENTS ...)
|
||||
## * add "message_runtime" and every package in MSG_DEP_SET to
|
||||
## catkin_package(CATKIN_DEPENDS ...)
|
||||
## * uncomment the add_*_files sections below as needed
|
||||
## and list every .msg/.srv/.action file to be processed
|
||||
## * uncomment the generate_messages entry below
|
||||
## * add every package in MSG_DEP_SET to generate_messages(DEPENDENCIES ...)
|
||||
|
||||
## Generate messages in the 'msg' folder
|
||||
add_message_files(
|
||||
FILES
|
||||
id_pos_angle.msg
|
||||
# Message1.msg
|
||||
# Message2.msg
|
||||
)
|
||||
|
||||
## Generate services in the 'srv' folder
|
||||
# add_service_files(
|
||||
# FILES
|
||||
# Service1.srv
|
||||
# Service2.srv
|
||||
# )
|
||||
|
||||
## Generate actions in the 'action' folder
|
||||
# add_action_files(
|
||||
# FILES
|
||||
# Action1.action
|
||||
# Action2.action
|
||||
# )
|
||||
|
||||
## Generate added messages and services with any dependencies listed here
|
||||
generate_messages(
|
||||
DEPENDENCIES
|
||||
std_msgs
|
||||
)
|
||||
|
||||
################################################
|
||||
## Declare ROS dynamic reconfigure parameters ##
|
||||
################################################
|
||||
|
||||
## To declare and build dynamic reconfigure parameters within this
|
||||
## package, follow these steps:
|
||||
## * In the file package.xml:
|
||||
## * add a build_depend and a exec_depend tag for "dynamic_reconfigure"
|
||||
## * In this file (CMakeLists.txt):
|
||||
## * add "dynamic_reconfigure" to
|
||||
## find_package(catkin REQUIRED COMPONENTS ...)
|
||||
## * uncomment the "generate_dynamic_reconfigure_options" section below
|
||||
## and list every .cfg file to be processed
|
||||
|
||||
## Generate dynamic reconfigure parameters in the 'cfg' folder
|
||||
# generate_dynamic_reconfigure_options(
|
||||
# cfg/DynReconf1.cfg
|
||||
# cfg/DynReconf2.cfg
|
||||
# )
|
||||
|
||||
###################################
|
||||
## catkin specific configuration ##
|
||||
###################################
|
||||
## The catkin_package macro generates cmake config files for your package
|
||||
## Declare things to be passed to dependent projects
|
||||
## INCLUDE_DIRS: uncomment this if your package contains header files
|
||||
## LIBRARIES: libraries you create in this project that dependent projects also need
|
||||
## CATKIN_DEPENDS: catkin_packages dependent projects also need
|
||||
## DEPENDS: system dependencies of this project that dependent projects also need
|
||||
catkin_package(
|
||||
# INCLUDE_DIRS include
|
||||
# LIBRARIES fiducial_transform
|
||||
# CATKIN_DEPENDS roscpp rospy std_msgs
|
||||
# DEPENDS system_lib
|
||||
CATKIN_DEPENDS message_runtime
|
||||
)
|
||||
|
||||
###########
|
||||
## Build ##
|
||||
###########
|
||||
|
||||
## Specify additional locations of header files
|
||||
## Your package locations should be listed before other locations
|
||||
include_directories(
|
||||
# include
|
||||
${catkin_INCLUDE_DIRS}
|
||||
)
|
||||
|
||||
## Declare a C++ library
|
||||
# add_library(${PROJECT_NAME}
|
||||
# src/${PROJECT_NAME}/fiducial_transform.cpp
|
||||
# )
|
||||
|
||||
## Add cmake target dependencies of the library
|
||||
## as an example, code may need to be generated before libraries
|
||||
## either from message generation or dynamic reconfigure
|
||||
# add_dependencies(${PROJECT_NAME} ${${PROJECT_NAME}_EXPORTED_TARGETS} ${catkin_EXPORTED_TARGETS})
|
||||
|
||||
## Declare a C++ executable
|
||||
## With catkin_make all packages are built within a single CMake context
|
||||
## The recommended prefix ensures that target names across packages don't collide
|
||||
# add_executable(${PROJECT_NAME}_node src/fiducial_transform_node.cpp)
|
||||
|
||||
## Rename C++ executable without prefix
|
||||
## The above recommended prefix causes long target names, the following renames the
|
||||
## target back to the shorter version for ease of user use
|
||||
## e.g. "rosrun someones_pkg node" instead of "rosrun someones_pkg someones_pkg_node"
|
||||
# set_target_properties(${PROJECT_NAME}_node PROPERTIES OUTPUT_NAME node PREFIX "")
|
||||
|
||||
## Add cmake target dependencies of the executable
|
||||
## same as for the library above
|
||||
# add_dependencies(${PROJECT_NAME}_node ${${PROJECT_NAME}_EXPORTED_TARGETS} ${catkin_EXPORTED_TARGETS})
|
||||
|
||||
## Specify libraries to link a library or executable target against
|
||||
# target_link_libraries(${PROJECT_NAME}_node
|
||||
# ${catkin_LIBRARIES}
|
||||
# )
|
||||
|
||||
#############
|
||||
## Install ##
|
||||
#############
|
||||
|
||||
# all install targets should use catkin DESTINATION variables
|
||||
# See http://ros.org/doc/api/catkin/html/adv_user_guide/variables.html
|
||||
|
||||
## Mark executable scripts (Python etc.) for installation
|
||||
## in contrast to setup.py, you can choose the destination
|
||||
# install(PROGRAMS
|
||||
# scripts/my_python_script
|
||||
# DESTINATION ${CATKIN_PACKAGE_BIN_DESTINATION}
|
||||
# )
|
||||
|
||||
## Mark executables and/or libraries for installation
|
||||
# install(TARGETS ${PROJECT_NAME} ${PROJECT_NAME}_node
|
||||
# ARCHIVE DESTINATION ${CATKIN_PACKAGE_LIB_DESTINATION}
|
||||
# LIBRARY DESTINATION ${CATKIN_PACKAGE_LIB_DESTINATION}
|
||||
# RUNTIME DESTINATION ${CATKIN_PACKAGE_BIN_DESTINATION}
|
||||
# )
|
||||
|
||||
## Mark cpp header files for installation
|
||||
# install(DIRECTORY include/${PROJECT_NAME}/
|
||||
# DESTINATION ${CATKIN_PACKAGE_INCLUDE_DESTINATION}
|
||||
# FILES_MATCHING PATTERN "*.h"
|
||||
# PATTERN ".svn" EXCLUDE
|
||||
# )
|
||||
|
||||
## Mark other files for installation (e.g. launch and bag files, etc.)
|
||||
# install(FILES
|
||||
# # myfile1
|
||||
# # myfile2
|
||||
# DESTINATION ${CATKIN_PACKAGE_SHARE_DESTINATION}
|
||||
# )
|
||||
|
||||
catkin_install_python(PROGRAMS bin/fiducial_transform_script
|
||||
DESTINATION ${CATKIN_PACKAGE_BIN_DESTINATION})
|
||||
|
||||
#############
|
||||
## Testing ##
|
||||
#############
|
||||
|
||||
## Add gtest based cpp test target and link libraries
|
||||
# catkin_add_gtest(${PROJECT_NAME}-test test/test_fiducial_transform.cpp)
|
||||
# if(TARGET ${PROJECT_NAME}-test)
|
||||
# target_link_libraries(${PROJECT_NAME}-test ${PROJECT_NAME})
|
||||
# endif()
|
||||
|
||||
## Add folders to be run by python nosetests
|
||||
# catkin_add_nosetests(test)
|
||||
|
|
@ -1,7 +0,0 @@
|
|||
#!/usr/bin/env python
|
||||
from fiducial_transform.fiducial_to_2d_pos_angle import main
|
||||
import sys
|
||||
|
||||
if __name__ == '__main__':
|
||||
main(sys.argv)
|
||||
|
||||
|
|
@ -1,4 +0,0 @@
|
|||
int32 id
|
||||
float32 x
|
||||
float32 y
|
||||
float32 angle
|
||||
|
|
@ -1,70 +0,0 @@
|
|||
<?xml version="1.0"?>
|
||||
<package format="2">
|
||||
<name>fiducial_transform</name>
|
||||
<version>0.0.0</version>
|
||||
<description>This package provides a script that transforms 3D position and orientation information from detected fiducial markers to 2D positions in the x-y-plane and orientation expressed as yaw angle (rotation around z axis). In addition, the id of the detected marker is published.</description>
|
||||
|
||||
<!-- One maintainer tag required, multiple allowed, one person per tag -->
|
||||
<!-- Example: -->
|
||||
<!-- <maintainer email="jane.doe@example.com">Jane Doe</maintainer> -->
|
||||
<maintainer email="simon.pirkelmann@uni-bayreuth.de">spirkelmann</maintainer>
|
||||
|
||||
|
||||
<!-- One license tag required, multiple allowed, one license per tag -->
|
||||
<!-- Commonly used license strings: -->
|
||||
<!-- BSD, MIT, Boost Software License, GPLv2, GPLv3, LGPLv2.1, LGPLv3 -->
|
||||
<license>MIT</license>
|
||||
|
||||
|
||||
<!-- Url tags are optional, but multiple are allowed, one per tag -->
|
||||
<!-- Optional attribute type can be: website, bugtracker, or repository -->
|
||||
<!-- Example: -->
|
||||
<!-- <url type="website">http://wiki.ros.org/marker_pos_angle</url> -->
|
||||
|
||||
|
||||
<!-- Author tags are optional, multiple are allowed, one per tag -->
|
||||
<!-- Authors do not have to be maintainers, but could be -->
|
||||
<!-- Example: -->
|
||||
<!-- <author email="jane.doe@example.com">Jane Doe</author> -->
|
||||
|
||||
|
||||
<!-- The *depend tags are used to specify dependencies -->
|
||||
<!-- Dependencies can be catkin packages or system dependencies -->
|
||||
<!-- Examples: -->
|
||||
<!-- Use depend as a shortcut for packages that are both build and exec dependencies -->
|
||||
<!-- <depend>roscpp</depend> -->
|
||||
<!-- Note that this is equivalent to the following: -->
|
||||
<!-- <build_depend>roscpp</build_depend> -->
|
||||
<!-- <exec_depend>roscpp</exec_depend> -->
|
||||
<!-- Use build_depend for packages you need at compile time: -->
|
||||
<!-- <build_depend>message_generation</build_depend> -->
|
||||
<!-- Use build_export_depend for packages you need in order to build against this package: -->
|
||||
<!-- <build_export_depend>message_generation</build_export_depend> -->
|
||||
<!-- Use buildtool_depend for build tool packages: -->
|
||||
<!-- <buildtool_depend>catkin</buildtool_depend> -->
|
||||
<!-- Use exec_depend for packages you need at runtime: -->
|
||||
<!-- <exec_depend>message_runtime</exec_depend> -->
|
||||
<!-- Use test_depend for packages you need only for testing: -->
|
||||
<!-- <test_depend>gtest</test_depend> -->
|
||||
<!-- Use doc_depend for packages you need only for building documentation: -->
|
||||
<!-- <doc_depend>doxygen</doc_depend> -->
|
||||
<buildtool_depend>catkin</buildtool_depend>
|
||||
<build_depend>roscpp</build_depend>
|
||||
<build_depend>rospy</build_depend>
|
||||
<build_depend>std_msgs</build_depend>
|
||||
<build_depend>message_generation</build_depend>
|
||||
<build_export_depend>roscpp</build_export_depend>
|
||||
<build_export_depend>rospy</build_export_depend>
|
||||
<build_export_depend>std_msgs</build_export_depend>
|
||||
<exec_depend>roscpp</exec_depend>
|
||||
<exec_depend>rospy</exec_depend>
|
||||
<exec_depend>std_msgs</exec_depend>
|
||||
<exec_depend>message_runtime</exec_depend>
|
||||
|
||||
|
||||
<!-- The export tag contains other, unspecified, tags -->
|
||||
<export>
|
||||
<!-- Other tools can request additional information be placed here -->
|
||||
|
||||
</export>
|
||||
</package>
|
||||
|
|
@ -1,12 +0,0 @@
|
|||
## ! DO NOT MANUALLY INVOKE THIS setup.py, USE CATKIN INSTEAD
|
||||
|
||||
from distutils.core import setup
|
||||
from catkin_pkg.python_setup import generate_distutils_setup
|
||||
|
||||
# fetch values from package.xml
|
||||
setup_args = generate_distutils_setup(
|
||||
packages=['fiducial_transform'],
|
||||
package_dir={'': 'src'},
|
||||
)
|
||||
|
||||
setup(**setup_args)
|
||||
|
|
@ -1,44 +0,0 @@
|
|||
import sys
|
||||
import rospy
|
||||
|
||||
from fiducial_transform.msg import id_pos_angle
|
||||
from fiducial_msgs.msg import FiducialTransformArray
|
||||
from tf.transformations import euler_from_quaternion
|
||||
|
||||
transform_topic = rospy.get_param("transform_topic", '/fiducial_transforms')
|
||||
output = rospy.get_param("output", 'True')
|
||||
|
||||
pub = rospy.Publisher('marker_id_pos_angle', id_pos_angle, queue_size=10)
|
||||
'''
|
||||
This callback function listens to fiducial messages that describe the translation and rotation of markers w.r.t. to the camera and transforms them to a position in the 2d plane and the angle of the robot in the plane
|
||||
'''
|
||||
def callback(data):
|
||||
for d in data.transforms:
|
||||
id = d.fiducial_id
|
||||
|
||||
q = d.transform.rotation
|
||||
t = d.transform.translation
|
||||
|
||||
euler = euler_from_quaternion([q.x, q.y, q.z, q.w])
|
||||
|
||||
m = id_pos_angle()
|
||||
m.id = id
|
||||
m.x = t.x
|
||||
m.y = -t.y
|
||||
m.angle = -euler[2]
|
||||
|
||||
if output == 'True':
|
||||
print("(marker_id, pos_x, pos_y, angle) = ({}, {}, {}, {})".format(m.id, m.x, m.y, m.angle))
|
||||
|
||||
pub.publish(m)
|
||||
|
||||
def main(args):
|
||||
rospy.init_node('fiducial_transform_node', anonymous=True)
|
||||
|
||||
print("Starting subscriber listening for {} topic".format(transform_topic))
|
||||
quaternion_sub = rospy.Subscriber(transform_topic, FiducialTransformArray, callback)
|
||||
|
||||
rospy.spin()
|
||||
|
||||
if __name__ == '__main__':
|
||||
main(sys.argv)
|
||||
|
|
@ -1,27 +0,0 @@
|
|||
import socket
|
||||
import json
|
||||
|
||||
HOST, PORT = "localhost", 42424
|
||||
|
||||
def move_grid(x, y, orientation, dimx, dimy):
|
||||
print("move grid")
|
||||
sock = socket.socket(socket.AF_INET, socket.SOCK_STREAM)
|
||||
sock.connect((HOST, PORT))
|
||||
payload = json.dumps({"x": x, "y": y, "dimx": dimx, "dimy": dimy, "orientation": orientation})
|
||||
sock.sendall(f"move_grid_blocking;{payload}\n".encode())
|
||||
target_reached = False
|
||||
try:
|
||||
while not target_reached:
|
||||
reply = sock.recv(1024)
|
||||
if reply == b'':
|
||||
raise RuntimeError
|
||||
#print("got reply: ", reply)
|
||||
target_reached = reply.decode() == 'ack\n'
|
||||
print("target_reached = ", target_reached)
|
||||
except RuntimeError:
|
||||
# try again
|
||||
print("controlling failed -> trying again")
|
||||
move_grid(x, y, orientation, dimx, dimy)
|
||||
|
||||
if __name__ == "__main__":
|
||||
move_grid(3,2,'v', 7, 4)
|
||||
|
|
@ -1,542 +0,0 @@
|
|||
import numpy as np
|
||||
import pygame
|
||||
import os
|
||||
import threading
|
||||
|
||||
from webapp import app
|
||||
|
||||
from event_server_comm import move_grid
|
||||
|
||||
BLACK = np.array([0, 0, 0], dtype=np.uint8)
|
||||
WHITE = np.array([255, 255, 255], dtype=np.uint8)
|
||||
GRAY = np.array([200, 200, 200], dtype=np.uint8)
|
||||
RED = np.array([255, 0, 0], dtype=np.uint8)
|
||||
BLUE = np.array([0, 0, 255], dtype=np.uint8)
|
||||
YELLOW = np.array([255, 255, 0], dtype=np.uint8)
|
||||
GREEN = np.array([0, 255, 0], dtype=np.uint8)
|
||||
|
||||
pygame.init()
|
||||
|
||||
pygame.font.init() # you have to call this at the start,
|
||||
# if you want to use this module.
|
||||
myfont = pygame.font.SysFont('Comic Sans MS', 55)
|
||||
myfont_small = pygame.font.SysFont('Comic Sans MS', 45)
|
||||
|
||||
P0_text = myfont.render('P0', False, tuple(BLACK))
|
||||
|
||||
tiledt = np.dtype([('color', np.uint8, 3), ('star', np.bool)])
|
||||
|
||||
|
||||
|
||||
class Board:
|
||||
valid_colors = [GRAY, RED, BLUE]
|
||||
|
||||
def __init__(self, dim_x, dim_y, n_coins=2, file=None):
|
||||
if file is None:
|
||||
self.tiles = np.zeros((dim_y, dim_x), dtype=tiledt)
|
||||
for x in range(dim_x):
|
||||
for y in range(dim_y):
|
||||
self.tiles[y, x]['color'] = Board.valid_colors[np.random.randint(len(Board.valid_colors))]
|
||||
|
||||
coins_distributed = n_coins == 0
|
||||
while not coins_distributed:
|
||||
coinx = np.random.randint(0, dim_x)
|
||||
coiny = np.random.randint(0, dim_y)
|
||||
self.tiles[coiny,coinx]['star'] = True
|
||||
coins_distributed = sum([t['star'] for t in self.tiles.flatten()]) == n_coins
|
||||
else:
|
||||
self.tiles = np.load(file)
|
||||
|
||||
def render(self, scale_fac):
|
||||
dimy, dimx = self.tiles.shape
|
||||
board_surf = pygame.Surface((dimx * scale_fac, dimy * scale_fac))
|
||||
|
||||
star_surf = pygame.Surface((scale_fac, scale_fac), pygame.SRCALPHA)
|
||||
pygame.draw.circle(star_surf, YELLOW, (int(0.5 * scale_fac), int(0.5 * scale_fac)), int(0.25 * scale_fac))
|
||||
|
||||
for y in range(self.tiles.shape[0]):
|
||||
for x in range(self.tiles.shape[1]):
|
||||
pygame.draw.rect(board_surf, tuple(self.tiles[y, x]['color']),
|
||||
(x * scale_fac, y * scale_fac, scale_fac, scale_fac), 0)
|
||||
pygame.draw.rect(board_surf, (0, 0, 0),
|
||||
(x * scale_fac, y * scale_fac, scale_fac, scale_fac), 1)
|
||||
if self.tiles[y, x]['star']:
|
||||
board_surf.blit(star_surf, (x * scale_fac, y * scale_fac, scale_fac, scale_fac))
|
||||
|
||||
return board_surf
|
||||
|
||||
def get_xdims(self):
|
||||
return self.tiles.shape[1]
|
||||
|
||||
def get_ydims(self):
|
||||
return self.tiles.shape[0]
|
||||
|
||||
# def __repr__(self):
|
||||
# s = ''
|
||||
# for y in range(self.tiles.shape[0]):
|
||||
# for x in range(self.tiles.shape[1]):
|
||||
# if (x,y) == (self.robot.x, self.robot.y):
|
||||
# s += self.robot.orientation
|
||||
# else:
|
||||
# s += '.'
|
||||
# s += '\n'
|
||||
# return s
|
||||
|
||||
|
||||
class Robot:
|
||||
orientations = ['^', 'left', 'down', 'right']
|
||||
resulting_orientation = {
|
||||
'^': {'left': '<', 'right': '>'},
|
||||
'>': {'left': '^', 'right': 'v'},
|
||||
'v': {'left': '>', 'right': '<'},
|
||||
'<': {'left': 'v', 'right': '^'},
|
||||
}
|
||||
|
||||
|
||||
def __init__(self, x, y, orientation, use_real_robot=False):
|
||||
self.x = x
|
||||
self.y = y
|
||||
self.orientation = orientation
|
||||
self.position_changed = False
|
||||
self.use_real_robot = use_real_robot
|
||||
|
||||
def get_forward_coordinates(self):
|
||||
# get the coordinates of the neighboring tile in the given direction
|
||||
if self.orientation == '^':
|
||||
return self.y - 1, self.x
|
||||
elif self.orientation == '>':
|
||||
return self.y, self.x + 1
|
||||
elif self.orientation == 'v':
|
||||
return self.y + 1, self.x
|
||||
elif self.orientation == '<':
|
||||
return self.y, self.x - 1
|
||||
else:
|
||||
raise Exception("error: undefined direction")
|
||||
|
||||
def get_angle(self):
|
||||
angle = {'>': 0, '^': np.pi/2, '<': np.pi, 'v': 3*np.pi/2}[self.orientation]
|
||||
return np.rad2deg(angle)
|
||||
|
||||
def render(self, scale_fac):
|
||||
robot_surf = pygame.Surface((scale_fac, scale_fac), pygame.SRCALPHA)
|
||||
pygame.draw.lines(robot_surf, (0, 0, 0), True, [(0.75 * scale_fac, 0.5 * scale_fac),
|
||||
(0.25 * scale_fac, 0.25 * scale_fac),
|
||||
(0.25 * scale_fac, 0.75 * scale_fac)], 3)
|
||||
robot_surf = pygame.transform.rotate(robot_surf, self.get_angle())
|
||||
return robot_surf
|
||||
|
||||
def update_pos(self, dimx, dimy):
|
||||
if self.use_real_robot:
|
||||
move_grid(self.x, self.y, self.orientation, dimx, dimy)
|
||||
self.position_changed = False
|
||||
|
||||
def __repr__(self):
|
||||
return f"({self.y}, {self.x}) - {self.orientation}"
|
||||
|
||||
|
||||
class Command:
|
||||
valid_actions = {'forward', 'left', 'right', 'P0', '-'}
|
||||
|
||||
def __init__(self, action=None, color=GRAY):
|
||||
if not (action in Command.valid_actions and any([np.all(color == c) for c in Board.valid_colors])):
|
||||
raise ValueError("invalid values for command")
|
||||
self.action = action
|
||||
self.color = color
|
||||
|
||||
def __repr__(self):
|
||||
return f"{self.action}: {self.color}"
|
||||
|
||||
def render(self, scale_fac):
|
||||
cmd_surf = pygame.Surface((scale_fac, scale_fac))
|
||||
cmd_surf.fill(tuple(self.color))
|
||||
|
||||
arrow_surf = pygame.Surface((300, 300), pygame.SRCALPHA)
|
||||
|
||||
pygame.draw.polygon(arrow_surf, (0, 0, 0),
|
||||
((0, 100), (0, 200), (200, 200), (200, 300), (300, 150), (200, 0), (200, 100)))
|
||||
arrow_surf = pygame.transform.scale(arrow_surf, (int(0.9*scale_fac), int(0.9*scale_fac)))
|
||||
|
||||
if self.action == 'forward':
|
||||
arrow_surf = pygame.transform.rotate(arrow_surf, 90)
|
||||
elif self.action == 'left':
|
||||
arrow_surf = pygame.transform.rotate(arrow_surf, 180)
|
||||
|
||||
if self.action in {'left', 'forward', 'right'}:
|
||||
cmd_surf.blit(arrow_surf, (0.05*scale_fac,0.05*scale_fac,0.95*scale_fac,0.95*scale_fac))
|
||||
elif self.action == 'P0':
|
||||
cmd_surf.blit(P0_text, (0.05*scale_fac,0.05*scale_fac,0.95*scale_fac,0.95*scale_fac))
|
||||
|
||||
return cmd_surf
|
||||
|
||||
class Programmer:
|
||||
def __init__(self, prg):
|
||||
self.prg = prg
|
||||
self.available_inputs = [Command('forward'), Command('left'), Command('right'), Command('P0'),
|
||||
Command('-', color=RED), Command('-', color=BLUE), Command('-', color=GRAY)]
|
||||
self.command_to_edit = 0
|
||||
self.screen_rect = None
|
||||
|
||||
def render(self, scale_fac):
|
||||
"""Render surface with possible inputs for the robot.
|
||||
|
||||
:return: surface of the input commands
|
||||
"""
|
||||
inp_surf = pygame.Surface((len(self.available_inputs) * scale_fac, 1 * scale_fac))
|
||||
for i, inp in enumerate(self.available_inputs):
|
||||
cmd_surf = inp.render(scale_fac)
|
||||
inp_surf.blit(cmd_surf, (i * scale_fac, 0, scale_fac, scale_fac))
|
||||
return inp_surf
|
||||
|
||||
def update_selected_command(self, pos):
|
||||
print(f"clicked at pos = {pos}")
|
||||
xoffset = pos[0] - self.screen_rect.x
|
||||
selected_input_index = xoffset * len(self.available_inputs) // self.screen_rect.width
|
||||
selected_input = self.available_inputs[selected_input_index]
|
||||
|
||||
edited_command = self.prg.cmds[self.command_to_edit]
|
||||
|
||||
print("command before edit = ", edited_command)
|
||||
if selected_input.action != '-':
|
||||
edited_command.action = selected_input.action
|
||||
else:
|
||||
edited_command.color = selected_input.color
|
||||
print("command after edit = ", edited_command)
|
||||
|
||||
class Program:
|
||||
def __init__(self, robot, board, cmds):
|
||||
self.cmds = cmds
|
||||
self.robot = robot
|
||||
self.board = board
|
||||
self.prg_counter = 0
|
||||
self.screen_rect = None
|
||||
|
||||
def step(self, state='running', check_victory=True):
|
||||
if self.prg_counter >= len(self.cmds):
|
||||
return 'game_over'
|
||||
cmd = self.cmds[self.prg_counter]
|
||||
self.prg_counter += 1
|
||||
|
||||
# current position
|
||||
x = self.robot.x
|
||||
y = self.robot.y
|
||||
|
||||
# current tile the robot is on
|
||||
tile = self.board.tiles[y, x]
|
||||
|
||||
# apply next instruction of the program
|
||||
if np.all(cmd.color == GRAY) or np.all(cmd.color == tile['color']):
|
||||
# matching color -> execute command
|
||||
if cmd.action == 'forward':
|
||||
ynew, xnew = self.robot.get_forward_coordinates()
|
||||
self.robot.x = xnew
|
||||
self.robot.y = ynew
|
||||
self.robot.position_changed = True
|
||||
#self.robot.update_pos(self.board.get_xdims(), self.board.get_ydims())
|
||||
elif cmd.action in {'left', 'right'}:
|
||||
self.robot.orientation = Robot.resulting_orientation[self.robot.orientation][cmd.action]
|
||||
#self.robot.update_pos(self.board.get_xdims(), self.board.get_ydims())
|
||||
self.robot.position_changed = True
|
||||
elif cmd.action == 'P0':
|
||||
self.prg_counter = 0
|
||||
else:
|
||||
#print("color not matching -> skipping command")
|
||||
pass
|
||||
|
||||
# update state for new robot position
|
||||
if (not (0 <= self.robot.x < self.board.tiles.shape[1])) or not (0 <= self.robot.y < self.board.tiles.shape[0]):
|
||||
# robot leaves the board -> GAME OVER
|
||||
print("GAME OVER")
|
||||
self.robot.update_pos(self.board.get_xdims(), self.board.get_ydims())
|
||||
return 'game_over'
|
||||
|
||||
# robot collects star on new tile
|
||||
tile = self.board.tiles[self.robot.y, self.robot.x]
|
||||
if tile['star']:
|
||||
tile['star'] = False
|
||||
|
||||
if check_victory and all([not t['star'] for t in self.board.tiles.flatten()]):
|
||||
self.robot.update_pos(self.board.get_xdims(), self.board.get_ydims())
|
||||
print("YOU WON")
|
||||
return 'won'
|
||||
|
||||
# by default we continue in the running state
|
||||
return state
|
||||
|
||||
def render(self, scale_fac, prg_counter_override=None):
|
||||
"""Render the current program. This will render all commands and highlight the next command to execute
|
||||
(determined by self.prg_counter).
|
||||
|
||||
The prg_counter_override can be used to highlight a different command instead. This is used during input mode
|
||||
to highlight the command the user will edit.
|
||||
|
||||
:param scale_fac:
|
||||
:param prg_counter_override:
|
||||
:return:
|
||||
"""
|
||||
prg_counter = self.prg_counter
|
||||
if prg_counter_override is not None:
|
||||
prg_counter = prg_counter_override
|
||||
prg_surf = pygame.Surface((5 * scale_fac, 1 * scale_fac))
|
||||
for i in range(5):
|
||||
if i < len(self.cmds):
|
||||
cmd = self.cmds[i]
|
||||
cmd_surf = cmd.render(scale_fac)
|
||||
else:
|
||||
cmd_surf = pygame.Surface((scale_fac,scale_fac))
|
||||
cmd_surf.fill(GRAY)
|
||||
if prg_counter is not None and i == prg_counter:
|
||||
pygame.draw.rect(cmd_surf, tuple(GREEN), (0, 0, scale_fac, scale_fac), 5)
|
||||
prg_surf.blit(cmd_surf, (i * scale_fac, 0, scale_fac, scale_fac))
|
||||
|
||||
return prg_surf
|
||||
|
||||
def get_clicked_command(self, pos):
|
||||
print(f"clicked at pos = {pos}")
|
||||
xoffset = pos[0] - self.screen_rect.x
|
||||
clicked_cmd = xoffset * len(self.cmds) // self.screen_rect.width
|
||||
print("clicked command = ", clicked_cmd)
|
||||
return clicked_cmd
|
||||
|
||||
|
||||
class Game:
|
||||
def __init__(self, dimx, dimy, robotx, roboty, orientation, use_real_robot=False):
|
||||
self.robot = Robot(x=robotx, y=roboty, orientation=orientation, use_real_robot=use_real_robot)
|
||||
#self.board = Board(dimx, dimy)
|
||||
self.board = Board(dimx, dimy, file='levels/56.npy')
|
||||
|
||||
# TODO fix number of commands at 5
|
||||
self.cmds = [Command('forward'), Command('left', color=RED), Command('left', color=BLUE), Command('P0'), Command('-')]
|
||||
self.state = 'reset'
|
||||
|
||||
self.prg = Program(self.robot, self.board, self.cmds)
|
||||
|
||||
self.programmer = Programmer(self.prg)
|
||||
|
||||
#self.scale_fac = 180
|
||||
self.scale_fac = 125
|
||||
self.beamer_mode = False
|
||||
self.screen = pygame.display.set_mode((int(self.board.tiles.shape[1] * self.scale_fac * 1.1),
|
||||
int((self.board.tiles.shape[0] + 2) * self.scale_fac * 1.2)))
|
||||
|
||||
self.game_over_text = myfont.render('GAME OVER', False, WHITE)
|
||||
self.won_text = myfont.render('YOU WON', False, BLACK)
|
||||
self.run_text = myfont.render('RUN', False, tuple(BLACK))
|
||||
self.stop_text = myfont_small.render('STOP', False, tuple(BLACK))
|
||||
self.step_text = myfont_small.render('STEP', False, tuple(BLACK))
|
||||
self.prg_text = myfont_small.render('CURRENT PROGRAM', False, tuple(GREEN))
|
||||
|
||||
|
||||
# save initial state
|
||||
self.initial_pos = (self.robot.x, self.robot.y, self.robot.orientation)
|
||||
self.initial_board_tiles = self.board.tiles.copy()
|
||||
|
||||
def render(self):
|
||||
"""Render the game screen.
|
||||
|
||||
This will render the board and the robot.
|
||||
Depending on the display mode it will also render the current program and the input commands for the robot.
|
||||
|
||||
:param prg_counter:
|
||||
:return:
|
||||
"""
|
||||
if self.beamer_mode:
|
||||
dx = self.xoffset
|
||||
dy = 0
|
||||
else:
|
||||
dx = int(0.05 * self.screen.get_width())
|
||||
dy = int(0.05 * self.screen.get_height())
|
||||
self.screen.fill(tuple(BLACK))
|
||||
|
||||
# render the board
|
||||
board_surf = self.board.render(self.scale_fac)
|
||||
|
||||
# render robot onto the board surface
|
||||
robot_surf = self.robot.render(self.scale_fac)
|
||||
board_surf.blit(robot_surf, (self.robot.x * self.scale_fac, self.robot.y * self.scale_fac, self.scale_fac, self.scale_fac))
|
||||
self.screen.blit(board_surf, (dx, dy, dx + self.board.tiles.shape[1] * self.scale_fac, dy + self.board.tiles.shape[0] * self.scale_fac))
|
||||
|
||||
# render program
|
||||
if self.state == 'input':
|
||||
# in input mode we highlight the command which is selected for edit
|
||||
prg_surf = self.prg.render(self.scale_fac, prg_counter_override=self.programmer.command_to_edit)
|
||||
else:
|
||||
# in other modes we render the current program counter
|
||||
prg_surf = self.prg.render(self.scale_fac)
|
||||
prg_surf = pygame.transform.scale(prg_surf, (self.screen.get_width() * 2 // 3, self.scale_fac * 2 // 3))
|
||||
self.prg.screen_rect = pygame.Rect(
|
||||
(dx, board_surf.get_height() + 2 * dy, prg_surf.get_width(), prg_surf.get_height()))
|
||||
# render input fields and buttons
|
||||
inp_surf = self.programmer.render(self.scale_fac)
|
||||
inp_surf = pygame.transform.scale(inp_surf, (self.screen.get_width() * 2 // 3, self.scale_fac * 2 // 3))
|
||||
self.programmer.screen_rect = pygame.Rect(
|
||||
(dx, board_surf.get_height() + prg_surf.get_height() + 3 * dy, inp_surf.get_width(), inp_surf.get_height()))
|
||||
btn_surf = pygame.Surface((3 * self.scale_fac // 2, self.scale_fac))
|
||||
self.btn_rect = pygame.Rect((2 * dx + prg_surf.get_width(), board_surf.get_height() + 2 * dy,
|
||||
btn_surf.get_height(), btn_surf.get_width()))
|
||||
if self.state == 'input':
|
||||
btn_surf.fill(tuple(GREEN))
|
||||
btn_surf.blit(self.run_text, (0, 10))
|
||||
elif self.state == 'running':
|
||||
btn_surf.fill(tuple(RED))
|
||||
btn_surf.blit(self.stop_text, (0, 10))
|
||||
elif self.state == 'stepping':
|
||||
btn_surf.fill(tuple(YELLOW))
|
||||
btn_surf.blit(self.step_text, (0, 10))
|
||||
|
||||
if not self.beamer_mode:
|
||||
# if we are not in beamer mode we render program and inputs below the board
|
||||
self.screen.blit(prg_surf, self.prg.screen_rect)
|
||||
|
||||
self.screen.blit(inp_surf, self.programmer.screen_rect)
|
||||
|
||||
self.screen.blit(btn_surf, self.btn_rect)
|
||||
else:
|
||||
prg_surf = pygame.transform.scale(prg_surf, (dx, dx//5))
|
||||
# in beamer mode we render the program to the left of the board to appear on the laptop
|
||||
self.screen.blit(prg_surf, (0,100))
|
||||
|
||||
prg_descr_surb = pygame.Surface((500, 100))
|
||||
#prg_descr_surb.blit(self.prg_text)
|
||||
self.screen.blit(self.prg_text, (50, 50))
|
||||
mode_text = myfont_small.render(f'STATE: {self.state}', False, tuple(GREEN))
|
||||
self.screen.blit(mode_text, (50, dx//5 + 350))
|
||||
|
||||
# render messages
|
||||
if self.state == 'game_over':
|
||||
game_over_surf = pygame.Surface(((self.screen.get_width() - dx) // 2, self.screen.get_height() // 2))
|
||||
game_over_surf.fill(tuple(BLACK))
|
||||
game_over_surf.blit(self.game_over_text, ((game_over_surf.get_width() - self.game_over_text.get_width()) // 2,
|
||||
(game_over_surf.get_height() - self.game_over_text.get_height()) // 2))
|
||||
self.screen.blit(game_over_surf, (dx + (self.screen.get_width() - dx) // 4, self.screen.get_height() // 4))
|
||||
pygame.display.update()
|
||||
pygame.time.wait(1500)
|
||||
self.state = 'reset'
|
||||
elif self.state == 'won':
|
||||
won_surf = pygame.Surface(((self.screen.get_width() - dx) // 2, self.screen.get_height() // 2))
|
||||
won_surf.fill(tuple(WHITE))
|
||||
won_surf.blit(self.won_text,
|
||||
((won_surf.get_width() - self.won_text.get_width()) // 2,
|
||||
(won_surf.get_height() - self.won_text.get_height()) // 2))
|
||||
self.screen.blit(won_surf, (dx + (self.screen.get_width() - dx) // 4, self.screen.get_height() // 4))
|
||||
pygame.display.update()
|
||||
pygame.time.wait(1500)
|
||||
self.state = 'reset'
|
||||
|
||||
pygame.display.flip()
|
||||
|
||||
def process_inputs(self):
|
||||
# proceed events
|
||||
for event in pygame.event.get():
|
||||
if event.type == pygame.QUIT:
|
||||
self.state = 'quit'
|
||||
# handle MOUSEBUTTONUP
|
||||
elif event.type == pygame.MOUSEBUTTONUP:
|
||||
pos = pygame.mouse.get_pos()
|
||||
|
||||
# select command to edit by the programmer
|
||||
if self.prg.screen_rect is not None:
|
||||
if self.prg.screen_rect.collidepoint(pos):
|
||||
print(f"clicked at pos = {pos}")
|
||||
self.programmer.command_to_edit = self.prg.get_clicked_command(pos)
|
||||
|
||||
# set the selected command to a new value
|
||||
if self.programmer.screen_rect is not None:
|
||||
if self.programmer.screen_rect.collidepoint(pos):
|
||||
self.programmer.update_selected_command(pos)
|
||||
|
||||
# clicked RUN/STOP button
|
||||
if self.btn_rect is not None and self.btn_rect.collidepoint(*pos):
|
||||
print(f"clicked at pos = {pos}")
|
||||
if self.state == 'running':
|
||||
self.state = 'input'
|
||||
elif self.state == 'input':
|
||||
self.state = 'running'
|
||||
elif self.state == 'stepping':
|
||||
self.state = self.prg.step(self.state)
|
||||
elif event.type == pygame.KEYUP:
|
||||
if event.key == pygame.K_x:
|
||||
if not self.beamer_mode:
|
||||
# switch to beamer mode
|
||||
self.xoffset = 1000
|
||||
os.environ['SDL_VIDEO_WINDOW_POS'] = f'{1920-self.xoffset}, 280'
|
||||
self.scale_fac = 180
|
||||
self.screen = pygame.display.set_mode((self.xoffset + self.board.tiles.shape[1] * self.scale_fac,
|
||||
self.board.tiles.shape[0] * self.scale_fac),
|
||||
pygame.NOFRAME)
|
||||
self.beamer_mode = True
|
||||
else:
|
||||
# switch to normal mode
|
||||
os.environ['SDL_VIDEO_WINDOW_POS'] = '0, 0'
|
||||
self.scale_fac = 125
|
||||
self.screen = pygame.display.set_mode((int(self.board.tiles.shape[1] * self.scale_fac * 1.1),
|
||||
int((self.board.tiles.shape[0] + 2) * self.scale_fac * 1.2)))
|
||||
self.beamer_mode = False
|
||||
elif event.key == pygame.K_s:
|
||||
# run program
|
||||
self.state = 'running'
|
||||
elif event.key == pygame.K_SPACE:
|
||||
if self.state != 'stepping':
|
||||
self.state = 'stepping'
|
||||
else:
|
||||
self.state = self.prg.step(self.state)
|
||||
elif event.key == pygame.K_r:
|
||||
self.state = 'reset'
|
||||
elif event.key == pygame.K_n:
|
||||
self.initial_board_tiles = Board(self.board.get_xdims(), self.board.get_ydims()).tiles.copy()
|
||||
self.state = 'reset'
|
||||
elif event.type == pygame.USEREVENT:
|
||||
for i, cmd in enumerate(event.cmds):
|
||||
self.cmds[i].action = cmd.action
|
||||
self.cmds[i].color = np.array(cmd.color, dtype=np.uint8)
|
||||
self.reset()
|
||||
self.state = 'running'
|
||||
return self.state
|
||||
|
||||
def reset(self):
|
||||
self.prg.prg_counter = 0
|
||||
self.robot.x = self.initial_pos[0]
|
||||
self.robot.y = self.initial_pos[1]
|
||||
self.robot.orientation = self.initial_pos[2]
|
||||
self.robot.update_pos(self.board.get_xdims(), self.board.get_ydims())
|
||||
self.board.tiles = self.initial_board_tiles.copy()
|
||||
return 'input'
|
||||
|
||||
def run(self):
|
||||
running = True
|
||||
while running:
|
||||
self.state = self.process_inputs()
|
||||
if self.state == 'input':
|
||||
pass
|
||||
elif self.state == 'running':
|
||||
self.state = self.prg.step()
|
||||
elif self.state == 'reset':
|
||||
self.state = self.reset()
|
||||
elif self.state == 'quit':
|
||||
running = False
|
||||
elif self.state == 'stepping':
|
||||
pass
|
||||
elif self.state == 'game_over' or self.state == 'won':
|
||||
pass
|
||||
else:
|
||||
print("unknown state")
|
||||
return
|
||||
|
||||
self.render()
|
||||
if self.robot.position_changed:
|
||||
self.robot.update_pos(self.board.get_xdims(), self.board.get_ydims())
|
||||
|
||||
pygame.time.wait(100)
|
||||
|
||||
if __name__ == "__main__":
|
||||
# launch webapp in thread
|
||||
webserver_thread = threading.Thread(target=app.run, kwargs={'host': '0.0.0.0', 'port': 5000})
|
||||
webserver_thread.start()
|
||||
|
||||
seed = 4
|
||||
np.random.seed(seed)
|
||||
game = Game(dimx=7, dimy=4, robotx=5, roboty=1, orientation='>', use_real_robot=False)
|
||||
game.run()
|
||||
|
||||
# TODOs
|
||||
# - in stepping mode (s) it is possible to drive outside of the map
|
||||
# - when no P0 command is present the program counter will overflow
|
||||
|
|
@ -1,124 +0,0 @@
|
|||
from gauss_turing import Program, Board, Command, Robot
|
||||
import numpy as np
|
||||
import json
|
||||
|
||||
levels = {
|
||||
0: lambda cmds: len(cmds) <= 3,
|
||||
1: lambda cmds: len(cmds) == 3
|
||||
}
|
||||
|
||||
def rate_level(robot_path, cmds, board):
|
||||
path_length = len(set(robot_path))
|
||||
n_cmds = len(cmds)
|
||||
n_cmd_colors = len(set([tuple(c.color) for c in cmds]))
|
||||
|
||||
difficulty = (path_length - 1) * (n_cmds + n_cmd_colors)
|
||||
|
||||
# place coins on the robot path to create a solution
|
||||
if difficulty > 0:
|
||||
n_coins = np.random.randint(1, min(path_length, 5)) - 1
|
||||
|
||||
# put one coin on last tile visited
|
||||
coins = [robot_path[-1]]
|
||||
|
||||
# distribute other coins randomly on the path
|
||||
# path without first and list tile
|
||||
unique_tiles = list(set(robot_path) - {robot_path[-1]} - {robot_path[0]})
|
||||
|
||||
for _ in range(n_coins):
|
||||
c = np.random.randint(0, len(unique_tiles))
|
||||
new_coin = unique_tiles.pop(c)
|
||||
coins.append(new_coin)
|
||||
pass
|
||||
else:
|
||||
coins = []
|
||||
|
||||
return difficulty, coins
|
||||
|
||||
def generate_level(dimx, dimy, max_steps=100):
|
||||
n_cmds = np.random.randint(2, 6)
|
||||
assert n_cmds <= 5
|
||||
|
||||
# generate random board without any coins
|
||||
board = Board(dimx, dimy, n_coins=0)
|
||||
|
||||
cmds = []
|
||||
actions = list(sorted(Command.valid_actions - {'-'}))
|
||||
# generate random commands
|
||||
for i in range(n_cmds):
|
||||
action = np.random.choice(actions)
|
||||
color = Board.valid_colors[np.random.randint(len(Board.valid_colors))]
|
||||
cmds.append(Command(action, color))
|
||||
|
||||
# generate robot at random position
|
||||
rx = np.random.randint(0, dimx-1)
|
||||
ry = np.random.randint(0, dimy-1)
|
||||
orientation = np.random.choice(['>','v','<','^'])
|
||||
r = Robot(rx, ry, orientation)
|
||||
|
||||
prg = Program(r, board, cmds)
|
||||
continue_running = True
|
||||
state = 'running'
|
||||
prg_counter_old = prg.prg_counter
|
||||
|
||||
robot_path = [(r.x, r.y)]
|
||||
step = 0
|
||||
|
||||
while continue_running and step < max_steps:
|
||||
#print(f"prg_counter = {prg.prg_counter} - robot: {r} - state: {state}")
|
||||
state = prg.step(state, check_victory=False)
|
||||
|
||||
robot_path.append((r.x, r.y))
|
||||
|
||||
stuck = prg.prg_counter == prg_counter_old
|
||||
|
||||
prg_counter_old = prg.prg_counter
|
||||
|
||||
if state == 'game_over' or stuck:
|
||||
continue_running = False
|
||||
|
||||
step += 1
|
||||
|
||||
last_pos = robot_path[-1]
|
||||
if not ((0 <= last_pos[0] < dimx) and (0 <= last_pos[1] < dimy)):
|
||||
# remove last entry of path if robot leaves the board
|
||||
robot_path.pop(-1)
|
||||
|
||||
difficulty, coins = rate_level(robot_path, cmds, board)
|
||||
|
||||
# put coins on the board
|
||||
for coin in coins:
|
||||
board.tiles[coin[1], coin[0]]['star'] = True
|
||||
n_coins = len(coins)
|
||||
|
||||
|
||||
return difficulty, board, n_coins, set(robot_path), (rx, ry, orientation), cmds
|
||||
|
||||
if __name__ == "__main__":
|
||||
np.random.seed(2)
|
||||
|
||||
levels = {}
|
||||
|
||||
for i in range(100):
|
||||
diff, board, n_coins, robot_path, init_robot_pos, solution = generate_level(7, 4)
|
||||
if diff > 0:
|
||||
print("difficulty: ", diff, "n_coins: ", n_coins, "path length: ", len(robot_path))
|
||||
if diff in levels:
|
||||
if n_coins > levels[diff]['n_coins'] and len(robot_path) > levels[diff]['path_length']:
|
||||
levels[diff] = {'board': board, 'init_robot_pos': init_robot_pos, 'solution': solution,
|
||||
'n_coins': n_coins, 'path_length': len(robot_path)}
|
||||
else:
|
||||
levels[diff] = {'board': board, 'init_robot_pos': init_robot_pos, 'solution': solution,
|
||||
'n_coins': n_coins, 'path_length': len(robot_path)}
|
||||
|
||||
level_info = {}
|
||||
for l, data in levels.items():
|
||||
np.save(f'levels/{l}.npy', data['board'].tiles)
|
||||
sol = [(cmd.action, tuple(map(int, cmd.color))) for cmd in data['solution']]
|
||||
level_info[l] = {'init_robot_pos': data['init_robot_pos'], 'solution': sol,
|
||||
'n_coins': int(data['n_coins']), 'path_length': int(data['path_length']),
|
||||
'file': f'levels/{l}.npy'}
|
||||
|
||||
with open('levels/level_info.json', 'w') as f:
|
||||
json.dump(level_info, f, indent=4)
|
||||
pass
|
||||
|
Before Width: | Height: | Size: 5.4 KiB |
|
Before Width: | Height: | Size: 6.9 KiB |
|
Before Width: | Height: | Size: 4.3 KiB |
|
Before Width: | Height: | Size: 9.2 KiB |
|
Before Width: | Height: | Size: 9.2 KiB |
|
|
@ -1,61 +0,0 @@
|
|||
.cmd-canvas {
|
||||
outline: 3px solid #dddddd;;
|
||||
width: 430px;
|
||||
height: 120px;
|
||||
margin: 50px auto 0;
|
||||
position: relative;
|
||||
}
|
||||
|
||||
.programmer-canvas {
|
||||
outline: 3px solid #dddddd;;
|
||||
width: 338px;
|
||||
height: 220px;
|
||||
margin: 50px auto 0;
|
||||
position: relative;
|
||||
}
|
||||
|
||||
.register {
|
||||
outline: 3px dashed #dddddd;;
|
||||
width: 120px;
|
||||
height: 240px;
|
||||
margin: 0px auto 0;
|
||||
position: relative;
|
||||
}
|
||||
|
||||
.box{
|
||||
width: 62px;
|
||||
height: 100px;
|
||||
position: absolute !important;
|
||||
top: 100px;
|
||||
font-size: 15px;
|
||||
color: #000000;
|
||||
line-height: 25px;
|
||||
text-align: center;
|
||||
cursor: move;
|
||||
}
|
||||
|
||||
.top-buffer { margin-top:20px; }
|
||||
|
||||
.center {
|
||||
margin: 20px;
|
||||
position: absolute;
|
||||
left: 50%;
|
||||
-ms-transform: translateX(-50%, -50%);
|
||||
transform: translateX(-50%, -50%);
|
||||
}
|
||||
|
||||
.cmd0 { left: 0; top: 0; background-color: #E74C3C; position: absolute !important;}
|
||||
.cmd1 { left: 92px; top: 0; background-color: #8E44AD; position: absolute !important;}
|
||||
.cmd2 { left: 184px; top: 0; background-color: #5DADE2; }
|
||||
.cmd3 { left: 276px; top: 0; background-color: #1ABC9C; }
|
||||
.cmd4 { left: 368px; top: 0; background-color: #F1C40F; }
|
||||
|
||||
.programmer_cmd0 { left: 0; top: 0; background-color: #E74C3C; position: absolute !important;}
|
||||
.programmer_cmd1 { left: 92px; top: 0; background-color: #8E44AD; position: absolute !important;}
|
||||
.programmer_cmd2 { left: 184px; top: 0; background-color: #5DADE2; }
|
||||
.programmer_cmd3 { left: 276px; top: 0; background-color: #1ABC9C; }
|
||||
.programmer_cmd4 { left: 38px; top: 120px; background-color: #F1C40F; }
|
||||
.programmer_cmd5 { left: 138px; top: 120px; background-color: #F39C12; }
|
||||
.programmer_cmd6 { right: 38px; top: 120px; background-color: #34495E; }
|
||||
|
||||
.card_hidden { background-color: #dddddd; }
|
||||
|
|
@ -1,136 +0,0 @@
|
|||
<!DOCTYPE html>
|
||||
<html lang="en">
|
||||
<head>
|
||||
<meta charset="utf-8">
|
||||
<meta name="viewport" content="width=device-width, initial-scale=1, shrink-to-fit=no">
|
||||
<title>imaginaerraum.de</title>
|
||||
|
||||
<script src="static/jquery-3.5.1.js"></script>
|
||||
<script src="static/jquery-ui.min.js"></script>
|
||||
<script src="static/bootstrap.min.js"></script>
|
||||
|
||||
<link rel="stylesheet" href="static/bootstrap.css">
|
||||
<link rel="stylesheet" href="static/style.css">
|
||||
|
||||
|
||||
</head>
|
||||
<body>
|
||||
<!-- container -->
|
||||
<div class="container">
|
||||
<!-- current program -->
|
||||
<div class="row top-buffer">
|
||||
Aktuelles Programm:
|
||||
<div class="cmd-canvas">
|
||||
{% for cmd in current_program %}
|
||||
<div class="box cmd{{ loop.index0 }}" id="prg_cmd{{ loop.index0 }}" data-action="{{ cmd.action }}" data-color="{{ cmd.color }}" data-img="prg_cmd_img{{ loop.index0 }}"
|
||||
style="background-color: rgba({{ cmd.color[0] }},{{ cmd.color[1] }},{{ cmd.color[2] }},0.85)">
|
||||
<img id="prg_cmd_img{{ loop.index0 }}" src="static/{{ cmd.action }}.png">
|
||||
{{ loop.index0 }}
|
||||
</div>
|
||||
{% endfor %}
|
||||
</div>
|
||||
</div>
|
||||
|
||||
<!-- possible commands -->
|
||||
<div class="row top-buffer">
|
||||
Mögliche Befehle:
|
||||
<div class="programmer-canvas">
|
||||
{% for cmd in valid_commands %}
|
||||
<div class="box programmer_cmd{{ loop.index0 }}" id="valid_cmd{{ loop.index0 }}" data-action="{{ cmd.action }}"
|
||||
data-color="{{ cmd.color }}" data-img="valid_cmd_img{{ loop.index0 }}"
|
||||
style="background-color: rgba({{ cmd.color[0] }},{{ cmd.color[1] }},{{ cmd.color[2] }},0.85)">
|
||||
<img id="valid_cmd_img{{ loop.index0 }}" src="static/{{ cmd.action }}.png">
|
||||
</div>
|
||||
{% endfor %}
|
||||
</div>
|
||||
</div>
|
||||
|
||||
<div class="row top-buffer center">
|
||||
<div class="col-sm">
|
||||
<input class="btn btn-primary" id="btnSubmit" type="submit" value="Befehle abschicken" />
|
||||
</div>
|
||||
<div class="col-sm">
|
||||
<div id = "alert_placeholder"></div>
|
||||
</div>
|
||||
</div>
|
||||
</div><!-- container -->
|
||||
|
||||
|
||||
<script>
|
||||
$(document).ready(function () {
|
||||
|
||||
var please_wait = $(".notification").hide();
|
||||
|
||||
var box = $(".box");
|
||||
|
||||
bootstrap_alert = function() {};
|
||||
bootstrap_alert.warning = function(message) {
|
||||
$('#alert_placeholder').html('<div class="alert alert-primary"><a class="close" data-dismiss="alert">×</a><span>'+message+'</span></div>')
|
||||
};
|
||||
|
||||
|
||||
$("#btnSubmit").click(function () {
|
||||
//alert("button");
|
||||
var cmds = {
|
||||
{% for i in range(5) %}
|
||||
"cmd{{ i }}": {"color": document.getElementById("prg_cmd{{ i }}").getAttribute("data-color"),
|
||||
"action": document.getElementById("prg_cmd{{ i }}").getAttribute("data-action")},
|
||||
{% endfor %}
|
||||
}
|
||||
//bootstrap_alert.warning('Bitte warten bis alle Spieler ihre Aktion gewählt haben!'); //$(please_wait).show();
|
||||
var cmds_json = JSON.stringify(cmds);
|
||||
|
||||
$.post("/send_cmds", {"cmds_json": cmds_json}, function (data) {
|
||||
console.log(data);
|
||||
/*
|
||||
if (data === 'OK') {
|
||||
location.reload(); // reload page to get new cards for next round
|
||||
}
|
||||
else {
|
||||
console.log('waiting...')
|
||||
$.get("/send_cmds", "", function (data) {
|
||||
if (data === 'OK') {
|
||||
location.reload(); // reload page to get new cards for next round
|
||||
}
|
||||
})
|
||||
}
|
||||
*/
|
||||
});
|
||||
|
||||
});
|
||||
|
||||
var edited_command = null;
|
||||
|
||||
box.click(function () {
|
||||
//debugger
|
||||
if ( this.id.includes('prg_cmd') ) {
|
||||
// program card clicked -> select clicked card for editing
|
||||
edited_command = this;
|
||||
}
|
||||
else if (this.id.includes('valid_cmd')) {
|
||||
// progamming card clicked -> edit currently selected card
|
||||
var this_card_action = this.getAttribute('data-action');
|
||||
var this_card_color = this.getAttribute('data-color');
|
||||
if (!!edited_command) { // only if there is a card selected
|
||||
console.log("editing command " + edited_command);
|
||||
if (this_card_action === "-") {
|
||||
// set color
|
||||
edited_command.setAttribute("data-color", this_card_color);
|
||||
edited_command.style["backgroundColor"] = this.style["backgroundColor"];
|
||||
}
|
||||
else {
|
||||
// set action
|
||||
edited_command.setAttribute("data-action", this_card_action)
|
||||
var edited_cmd_img = document.getElementById(edited_command.getAttribute("data-img"));
|
||||
var prg_img = document.getElementById(this.getAttribute("data-img"));
|
||||
edited_cmd_img.src = prg_img.src;
|
||||
}
|
||||
}
|
||||
}
|
||||
});
|
||||
|
||||
});
|
||||
</script>
|
||||
|
||||
</body>
|
||||
</html>
|
||||
|
|
@ -1,163 +0,0 @@
|
|||
from flask import Flask, render_template, request, session, make_response
|
||||
import socket
|
||||
import time
|
||||
import numpy as np
|
||||
from playsound import playsound
|
||||
from itertools import zip_longest
|
||||
import random
|
||||
import json
|
||||
import pygame
|
||||
|
||||
app = Flask(__name__)
|
||||
app.secret_key = b'RoboRallyRolling'
|
||||
|
||||
probabilities = [0.21428571428571427, 0.14285714285714285, 0.07142857142857142, 0.07142857142857142,
|
||||
0.21428571428571427, 0.21428571428571427, 0.07142857142857142]
|
||||
|
||||
#deck = roborally.CardDeck()
|
||||
|
||||
class Cmd:
|
||||
possible_moves = ['forward', 'left', 'right', 'P0']
|
||||
possible_colors = [(200,200,200), (255, 0, 0), (0,0,255)]
|
||||
|
||||
def __init__(self, action, color):
|
||||
self.action = action
|
||||
self.color = color
|
||||
|
||||
def __str__(self):
|
||||
return "Cmd No. " + self.action
|
||||
|
||||
def __repr__(self):
|
||||
return self.action + " " + str(self.color)
|
||||
|
||||
|
||||
available_robots = {
|
||||
0: {'id': 11, 'ip': '192.168.1.11', 'x': 1, 'y': 2, 'orientation': '>'},
|
||||
1: {'id': 12, 'ip': '192.168.1.12', 'x': 3, 'y': 3, 'orientation': '>'}
|
||||
}
|
||||
|
||||
|
||||
players = {}
|
||||
|
||||
|
||||
class Player:
|
||||
MAX_PLAYERS = 4
|
||||
player_counter = 0
|
||||
|
||||
def __init__(self):
|
||||
if Player.player_counter < Player.MAX_PLAYERS:
|
||||
self.id = Player.player_counter
|
||||
Player.player_counter += 1
|
||||
|
||||
self.max_cards = 9
|
||||
|
||||
self.player_hand = deck.draw_cards(self.max_cards)
|
||||
print("current hand: ", [str(c) for c in self.player_hand])
|
||||
|
||||
self.action_count = 5
|
||||
self.action_chosen = False
|
||||
|
||||
self.initialize_robot()
|
||||
|
||||
else:
|
||||
print("max players reached!")
|
||||
|
||||
def initialize_robot(self):
|
||||
x = available_robots[self.id]['x']
|
||||
y = available_robots[self.id]['y']
|
||||
marker_id = available_robots[self.id]['id']
|
||||
ip = available_robots[self.id]['ip']
|
||||
orientation = available_robots[self.id]['orientation']
|
||||
self.robot = game.board.create_robot(x, y, orientation, self.id, marker_id)
|
||||
|
||||
if game.comm_socket is not None:
|
||||
cmd = f"initialize_robot, {marker_id}, {ip}, {x-1}, {y-1}, {orientation}\n"
|
||||
game.comm_socket.sendall(cmd.encode())
|
||||
data = game.comm_socket.recv(32)
|
||||
|
||||
if data.decode() == 'OK\n':
|
||||
print("robot sucessfully initialized!")
|
||||
else:
|
||||
print("error: could not initialize robot!")
|
||||
self.robot = None
|
||||
|
||||
def draw_new_cards(self):
|
||||
self.player_hand += deck.draw_cards(self.max_cards - len(self.player_hand))
|
||||
|
||||
|
||||
@app.route('/send_cmds', methods=['POST', 'GET'])
|
||||
def send_cmds():
|
||||
if request.method == 'POST':
|
||||
cmds = json.loads(request.form['cmds_json'])
|
||||
|
||||
cmd_list = []
|
||||
for cmd_nr in [f"cmd{i}" for i in range(5)]:
|
||||
cmd = cmds[cmd_nr]
|
||||
action = cmd['action']
|
||||
color_str = cmd['color']
|
||||
color_str = color_str.strip("()").split(",")
|
||||
color = tuple(map(int, color_str))
|
||||
cmd_list.append(Cmd(action, color))
|
||||
print("got commands: ", cmd_list)
|
||||
ev = pygame.event.Event(pygame.USEREVENT, {'cmds': cmd_list})
|
||||
pygame.event.post(ev)
|
||||
|
||||
# send commands to the game
|
||||
|
||||
# if game.ready():
|
||||
# game.process_actions()
|
||||
#
|
||||
# return 'OK'
|
||||
# else:
|
||||
# return 'please wait'
|
||||
return "OK"
|
||||
elif request.method == 'GET':
|
||||
# GET is used when we have to wait for other players to finish
|
||||
while not game.processing_done: # wait for other players to choose commands and processing to finish
|
||||
pass
|
||||
|
||||
return 'OK'
|
||||
|
||||
WHITE = (255, 255, 255)
|
||||
GRAY = (200, 200, 200)
|
||||
RED = (255, 0, 0)
|
||||
BLUE = (0, 0, 255)
|
||||
|
||||
@app.route('/', methods=['GET', 'POST'])
|
||||
def hello_world():
|
||||
prg = [Cmd('forward', GRAY), Cmd('left', GRAY), Cmd('right', BLUE),
|
||||
Cmd('P0', GRAY), Cmd('right', RED)]
|
||||
valid_cmds = [Cmd('forward', WHITE), Cmd('right', WHITE), Cmd('left', WHITE),
|
||||
Cmd('P0', WHITE), Cmd('-', RED), Cmd('-', BLUE), Cmd('-', GRAY)]
|
||||
|
||||
if request.method == 'GET':
|
||||
robot_info = None
|
||||
return render_template('drag_example.html', current_program=prg, valid_commands=valid_cmds, robot_info=robot_info)
|
||||
elif request.method == 'POST':
|
||||
# print(request.form)
|
||||
|
||||
if request.form.get('drag') and request.form.get('drop'):
|
||||
# swap cards in the current hand
|
||||
i1 = int(request.form.get('drag')) # number of first card
|
||||
i2 = int(request.form.get('drop')) # number of second card
|
||||
|
||||
card1 = deck.deck[i1] # get card by number
|
||||
card2 = deck.deck[i2]
|
||||
|
||||
print("swapping {} and {}".format(card1, card2))
|
||||
|
||||
j1 = player_hand.index(card1) # get index of card in the hand
|
||||
j2 = player_hand.index(card2)
|
||||
|
||||
player_hand[j1], player_hand[j2] = player_hand[j2], player_hand[j1] # swap the cards in the list
|
||||
|
||||
# print("current hand: ", [str(c) for c in player_hand[player_id]])
|
||||
|
||||
return 'OK'
|
||||
else:
|
||||
return render_template('drag_example.html', cmds=player_hand, player_id=player_id)
|
||||
|
||||
|
||||
if __name__ == '__main__':
|
||||
#app.run(host='192.168.1.222', port=5000)
|
||||
app.run(host='0.0.0.0', port=5000)
|
||||